
Infrahub is a platform that helps you organize and manage the data that defines your infrastructure.
It brings together everything that makes up your environment, such as devices, interfaces, services, circuits, racks, locations, routing or anything you can think of into a consistent and structured system.
Instead of relying on scattered tools or spreadsheets, Infrahub lets you connect your data, logic, and automation in one workflow. It’s built to be flexible, so you can model your infrastructure the way you need while keeping full visibility and version history of every change.
When working with such important data, you don’t want to make changes without a proper process to review them. Infrahub includes a built-in change management workflow that helps you manage updates safely and in a controlled way.
It works somewhat like Git for your infrastructure data inside Infrahub. You can create branches, test changes, and merge updates safely, all while using your existing automation and deployment tools.
In this post, we’ll go through how Infrahub manages change management workflow, including:
- Infrahub branches
- Infrahub Proposed Changes
- Review and approval process
- Mandatory change approvals
- Roles and permissions
- Schema and branches
- Checks
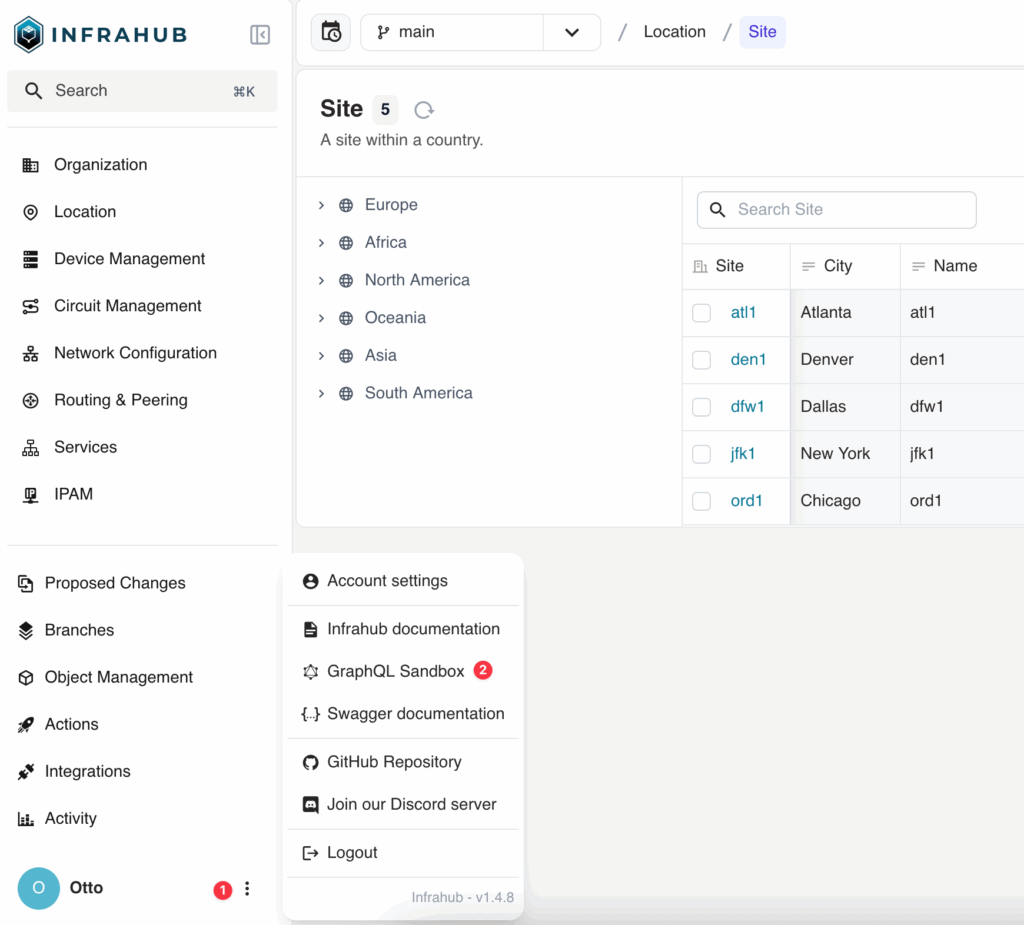
What are Infrahub branches?
In Infrahub, version control is natively integrated into the graph database.
You can think of Infrahub branches much like Git branches. In a typical Git workflow, you start from the main branch, create a new branch to make your changes, and work there without affecting the main version.
Once the changes are ready, you open a pull request, review the updates, and then merge them back into the main branch. This allows multiple people to work on different features at the same time while keeping the main environment untouched.
In Infrahub, when you need to modify existing data, add something new, or remove something, you don’t work directly on the main branch. Similar to Git, you can create a new branch and make your changes there without affecting the main branch. Once everything looks good, you can review and merge those changes.
Infrahub uses this branching concept from the ground up, giving you a safe and structured way to manage and evolve your infrastructure data while giving you an immutable history of changes over time.
For most of this post, we’ll use the publicly available Infrahub sandbox. You can follow along and try everything yourself without setting up anything locally.
Creating a new branch in Infrahub
Let’s look at a simple example to understand how this works. We’ll create a new branch, make a small change, and then view the difference between the branches.
In the Infrahub sandbox, let’s add a description to one of the devices called atl1-core1.
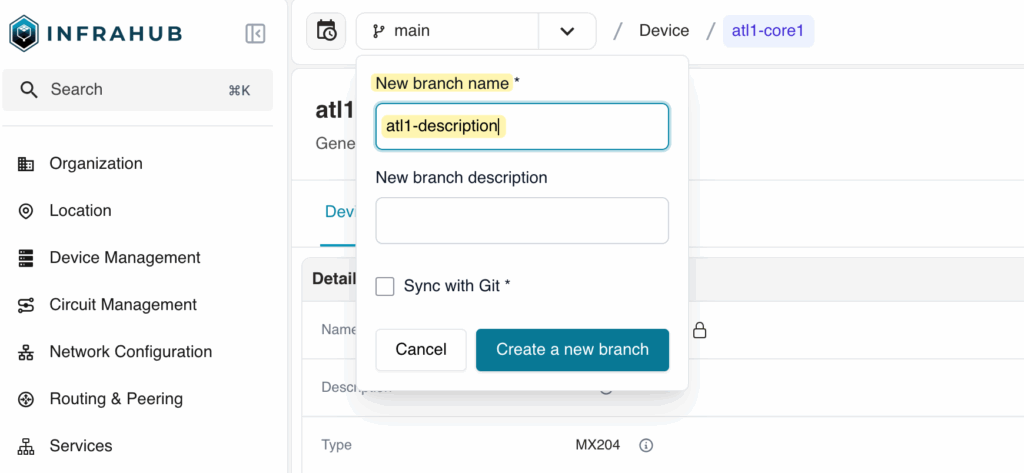
You can open the Infrahub branch menu from the top left corner, where you’ll see the current branch set to main by default. To view existing branches, click the down arrow next to the branch name. You can also create a new branch by selecting the + icon.
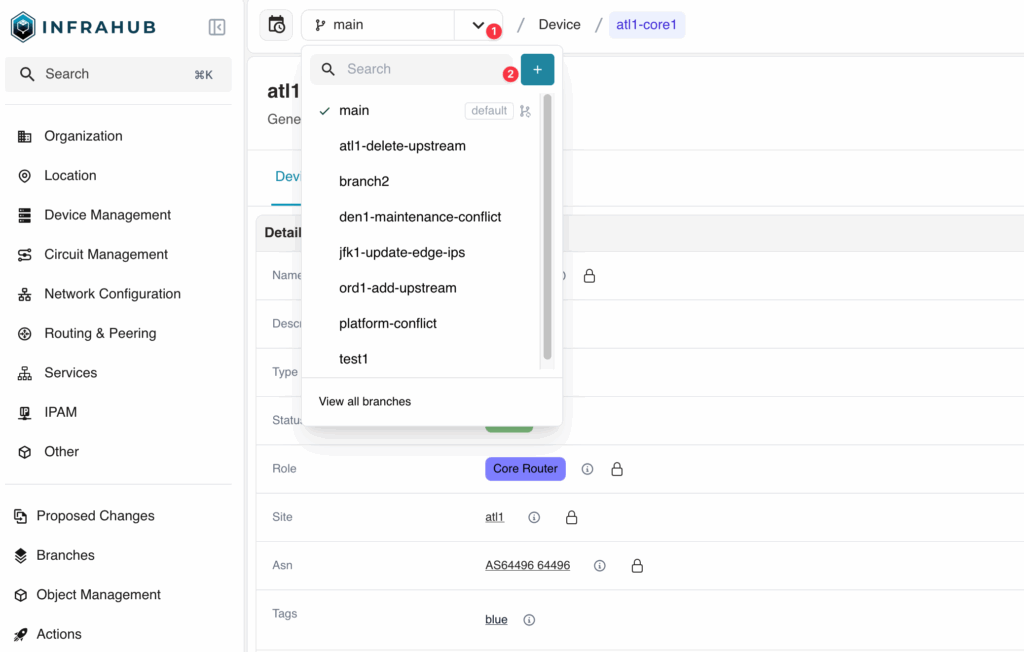
Let’s create a new branch called atl1-description. Once it’s created, make sure you’re inside this branch. You can confirm this by checking that the branch name at the top shows atl1-description.
Making changes inside the branch
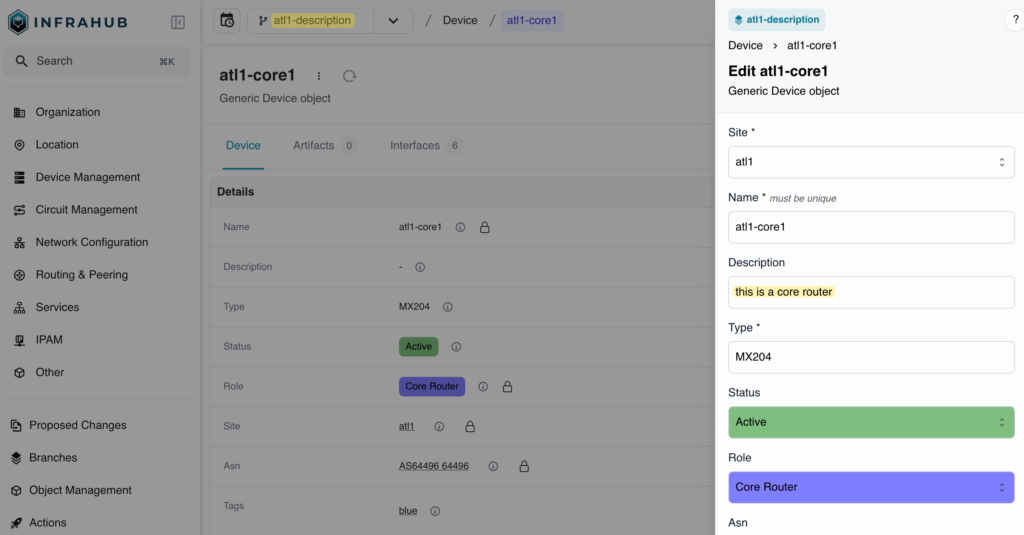
Now that you’re working inside this branch, you can safely make changes without affecting the main branch.
This is one of Infrahub’s most powerful features, designed from day one to make working with infrastructure data safe and reliable. It allows you to experiment or update the data confidently without risking data in the main branch.
Let’s add a description to the atl1-core1 device and save it.
Viewing the diff
Once that’s done, head to the Branches tab on the left and select your new branch. You’ll see a clear view of what changed. If you made multiple edits, you’d see all of them listed.
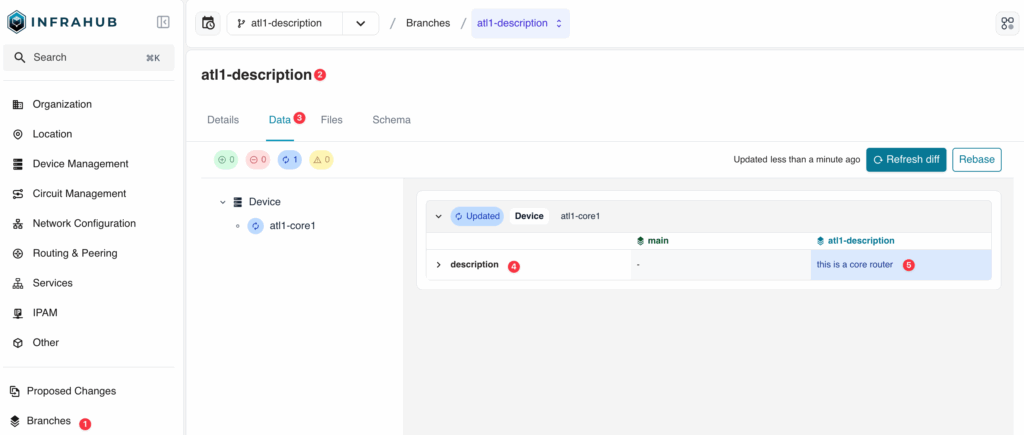
This visibility is key when managing infrastructure data because it helps you understand exactly what was modified before merging or approving any change.
Creating a branch with GraphQL and infrahubctl
You can also create a new branch using GraphQL or the Infrahub CLI tool called infrahubctl. Infrahub includes a built-in GraphQL environment where you can run queries and mutations directly from the UI.
From here, you can easily create a new branch by running a simple mutation, just like in the example shown below.
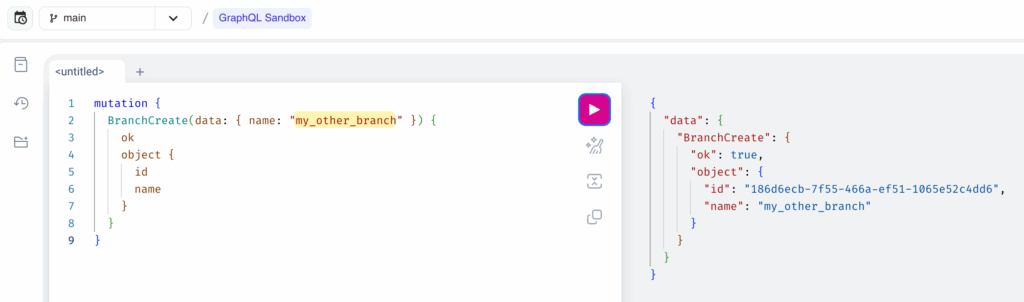
If you prefer using the command line, you can do the same with infrahubctl. It provides commands to interact with Infrahub programmatically.
infrahubctl branch create my_other_branch2If you’re new to infrahubctl, I covered it in detail in previous posts. You can also find installation and setup instructions in the infrahubctl documentation.
Reviewing more changes
In the previous example, we only updated a description to keep things simple. But I went ahead and created another branch where I made a few more changes: removed a circuit, added a new device, created a new platform, and made some smaller updates.
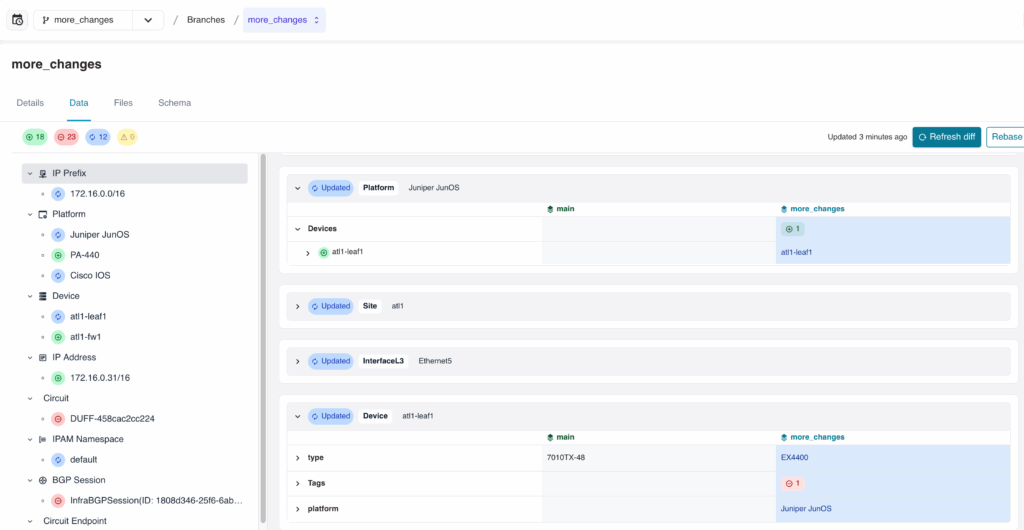
In the diff view, Infrahub gives you detailed information on exactly what changed. You can see every addition, deletion, and update across different objects in one place.
This provides a clear and comprehensive view of all modifications before they are reviewed or merged, which is incredibly useful when managing larger or more complex updates.
What are Proposed Changes in Infrahub?
Now that we’ve created a branch, made a change, and viewed the diff, the next step is to follow a proper workflow where someone can review, comment on, and approve/reject the change. Infrahub has a built-in feature for this called Proposed Changes.
A Proposed Change in Infrahub is a structured workflow mechanism that enables teams to review, discuss, and merge changes in a controlled and collaborative manner. It serves as the primary method for implementing infrastructure changes safely while maintaining proper oversight and governance. This process is very similar to a Git pull request.
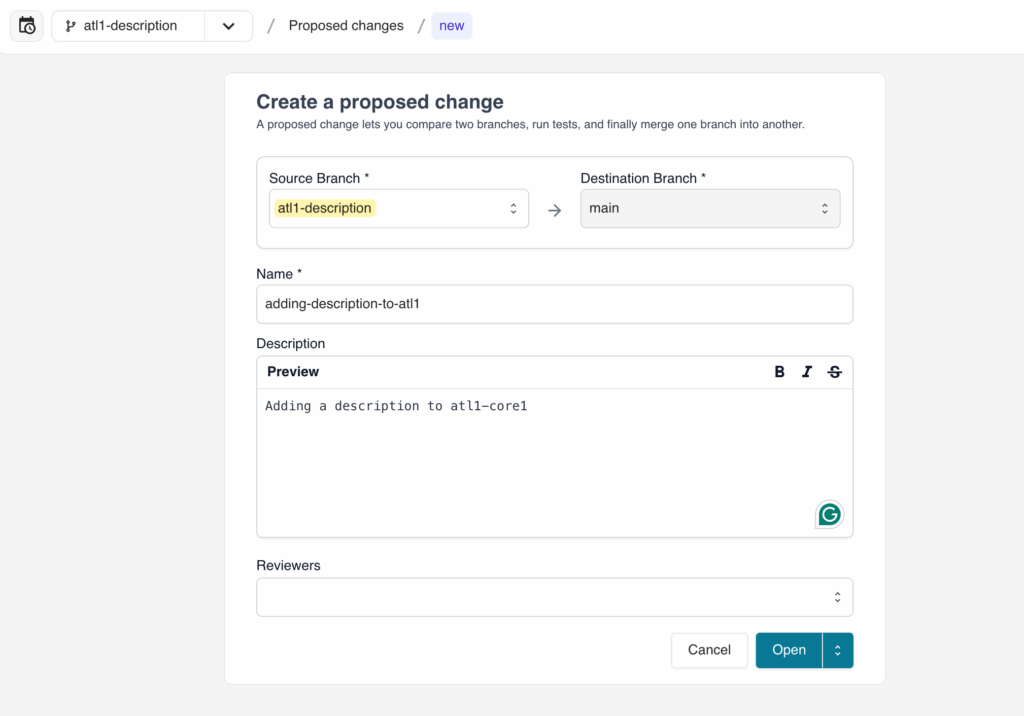
Creating a new Proposed Change
You can access it by selecting Proposed Changes from the menu on the left and then choosing New Proposed Change.
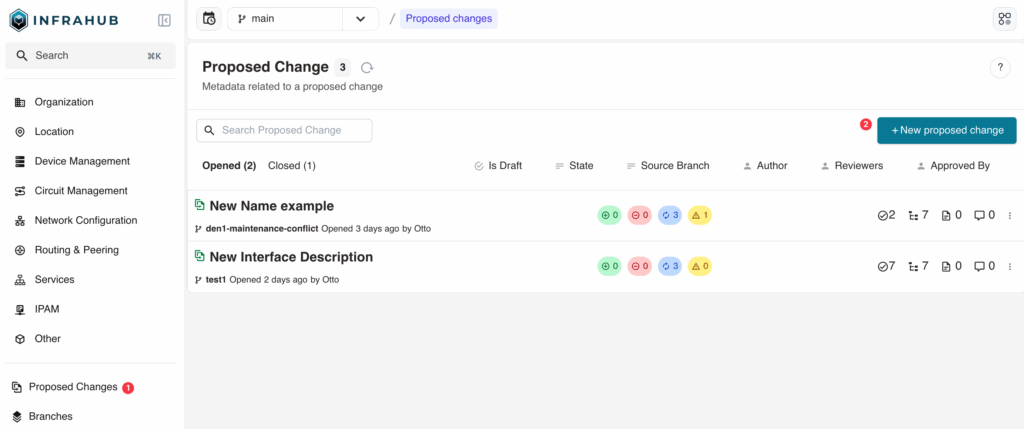
Next, you’ll select the source branch (in our case, atl1-description) and the target branch (main). You can give it a name, add a short description, and even assign specific reviewers.
Reviewing and merging the Proposed Change
Inside the Proposed Change, reviewers can see exactly what has changed. You can also have pre-defined checks (more on this later) that must pass before the merge is allowed.

Once everything looks good and the checks are complete, the reviewer can approve and merge the changes.

This workflow is important because it adds a layer of safety and accountability, ensuring that every change to your source-of-truth data is reviewed and verified before it’s applied.
Implementing mandatory change approval
Infrahub Enterprise includes a feature that lets you enforce approval policies before changes are merged. This adds an extra layer of control to the change management workflow by making approvals mandatory.
With this feature, you can define policies that require at least one approval before a proposed change can be merged. If someone modifies the branch after it’s been approved, Infrahub automatically revokes the approval, ensuring the change is reviewed again before it’s applied.
Infrahub keeps track of any new edits made to that same branch. If someone then makes another change after it’s already been approved, Infrahub automatically cancels (revokes) the previous approval.
This capability is available in the Enterprise edition of Infrahub and is ideal for teams that need stricter governance or compliance around infrastructure updates. It helps maintain accountability while keeping your change workflow consistent and auditable.
Defining roles and permissions in the change process
With roles and permissions, you can control who can make, review, and approve changes in Infrahub.
This setup helps enforce a clear workflow where no one can edit directly in the default branch, all updates must be made in separate branches and submitted as Proposed Changes, and only designated reviewers (Network Team, for example) can approve and merge those changes.
You can learn more about configuring roles and permissions in the Infrahub documentation:
Changing the Infrahub schema in a branch
In Infrahub, branching isn’t limited to just data. You can also use branches when working with schemas.
A schema in Infrahub defines the structure of your data, including how objects relate to each other and what attributes they have. Updating the schema is just as important as updating the data itself because both define how your infrastructure is modelled and managed.
For this example, we’ll install Infrahub locally alongside infrahubctl, clone the Infrahub Schema Library, and import the base schema into our new Infrahub instance.
curl https://infrahub.opsmill.io | docker compose -p infrahub -f - up -d
pip install 'infrahub-sdk[ctl]'
export INFRAHUB_API_TOKEN="186d6fc0-d941-fb68-352-c51e2d59e621"
git clone https://github.com/opsmill/schema-library.git
infrahubctl schema load schema-library/base/
infrahubctl schema load schema-library/extensions/location_minimal/
Once everything is set up, we’ll create a new branch using infrahubctl.
infrahubctl branch create schema_changeNext, we’ll make a small schema change. In the platform node, there’s an attribute called description, which is currently marked as optional. We’ll change this field to false just for demonstration purposes.
diff --git a/base/dcim.yml b/base/dcim.yml
index be8232b..848b224 100644
--- a/base/dcim.yml
+++ b/base/dcim.yml
@@ -387,7 +387,7 @@ nodes:
         order_weight: 1000
       - name: description
         kind: Text
-        optional: true
+        optional: false
         order_weight: 1200
       - name: nornir_platform
         kind: Text
After making this change and loading the schema to the new branch, you can open the Infrahub GUI and view the diff for your new branch under the Schema tab.
infrahubctl schema load --branch schema_change schema-library/base/dcim.yml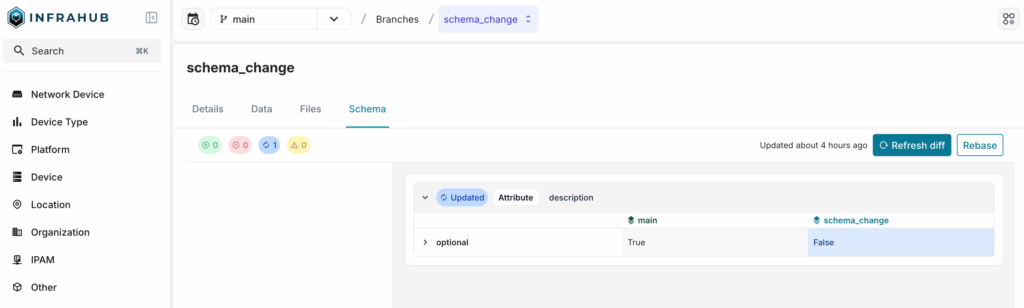
You’ll see the update clearly highlighted. Just like with data changes, you can review and merge the branch once you’re satisfied.
Running built-in and user-defined checks
Earlier, we looked at how a human can review and approve changes before they are merged. In addition to that, Infrahub also supports checks that run against a branch to make sure the changes follow certain rules or conditions.
Checks can be built-in or user-defined. For example, a check might verify that a device name follows a specific naming convention or ensure certain design rules are followed, like making sure an edge router has two redundant links to the ISP or a server has two uplinks using LACP or MLAG.
To keep the example simple, let’s look at how we can make sure everyone follows a consistent naming convention for network devices. We’ll use a pattern where each device name includes its location, role, and ends with digits. For example, ldn-core01 or ny-edge02. This makes it easy to identify what and where each device is.
With a check in place, if someone adds a new device or changes an existing name that doesn’t follow this pattern, the check will fail automatically. This helps keep naming consistent across the environment and prevents small mistakes from slipping through.
To run checks in Infrahub, you need a remote Git repository that’s connected to your Infrahub instance. This repository will store all the check definitions and related files.
Before continuing, you should be familiar with using .infrahub.yml and working with remote Git repositories. These topics are outside the scope of this post, but the documentation has more detail if needed:
Creating a GraphQL query and check definitions
Using our simple example of enforcing a device naming convention, let’s walk through how this works.
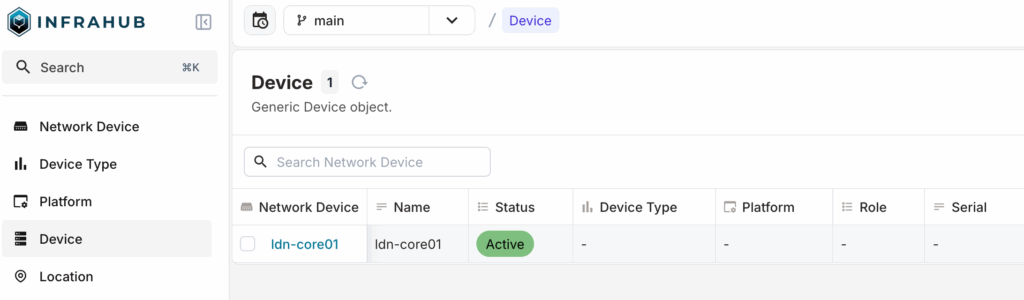
In our local Infrahub instance from earlier, we have a single device called ldn-core01.
Our goal is to make sure that if someone tries to rename existing devices or add a new one that doesn’t follow the naming rule, the check should fail automatically during the proposed change workflow.
To make this work, we need a few files that work together. Here’s the directory structure and files we will be using.
.
├── checks
│   └── devicename_check.py
├── queries
│   └── device_query.gql
└── .infrahub.ymlchecks/devicename_check.py: contains the Python code that validates device names against the defined naming pattern using.queries/device_query.gql: a GraphQL query that retrieves all device names from Infrahub for the check to process..infrahub.yml: a configuration file that ties the query and the check together so Infrahub knows how to run them.
First, there’s a GraphQL query file (queries/device_query.gql) that retrieves the names of all devices from Infrahub. Here’s the query and the output showing the current devices in our instance.
queries/device_query.gql
query DeviceQuery {
   DcimGenericDevice {
   edges {
     node {
       name {
         value
       }
     }
   }
 }
}
output
{
 "data": {
   "DcimGenericDevice": {
     "edges": [
       {
         "node": {
           "name": {
             "value": "ldn-core01"
           }
         }
       }
     ]
   }
 }
}
Then, we have a Python file that takes this query output, loops through the device names, and validates each one against the defined pattern.
checks/devicename_check.py
import re
from infrahub_sdk.checks import InfrahubCheck
RE_DEVICE_NAME = re.compile(r"^[a-z]+-[a-z]+[0-9]+$")
class DeviceNameCheck(InfrahubCheck):
    query = "device_query"
    def validate(self, data):
        for device in data["DcimGenericDevice"]["edges"]:
            name = device["node"]["name"]["value"]
            if not RE_DEVICE_NAME.match(name):
                self.log_error(
                    message=f"Invalid device name: {name}. Device names must follow pattern 'string-string01'",
                    object_id=name,
                    object_type="DcimGenericDevice"
                )
Finally, an .infrahub.yml file ties everything together by mapping the query and the check so Infrahub knows how to use them.
.infrahub.yml
---
queries:
  - name: device_query
    file_path: queries/device_query.gql
check_definitions:
  - name: check_device_name
    class_name: DeviceNameCheck
    file_path: checks/devicename_check.py
When these files are stored in a remote Git repository connected to Infrahub, it can automatically import and run the check whenever a proposed change is created or updated.
Adding check files to an external Git repository
Now that we have the files, we need to place them in a Git repository. You might already have a repository with an existing .infrahub.yml file, or you can create a new one just for this purpose.
Once the repository is set up, you can add it to Infrahub. You can add a remote Git repository to Infrahub by navigating to Integrations > Git Repositories in the web interface. There, you’ll provide the repository URL along with authentication details.
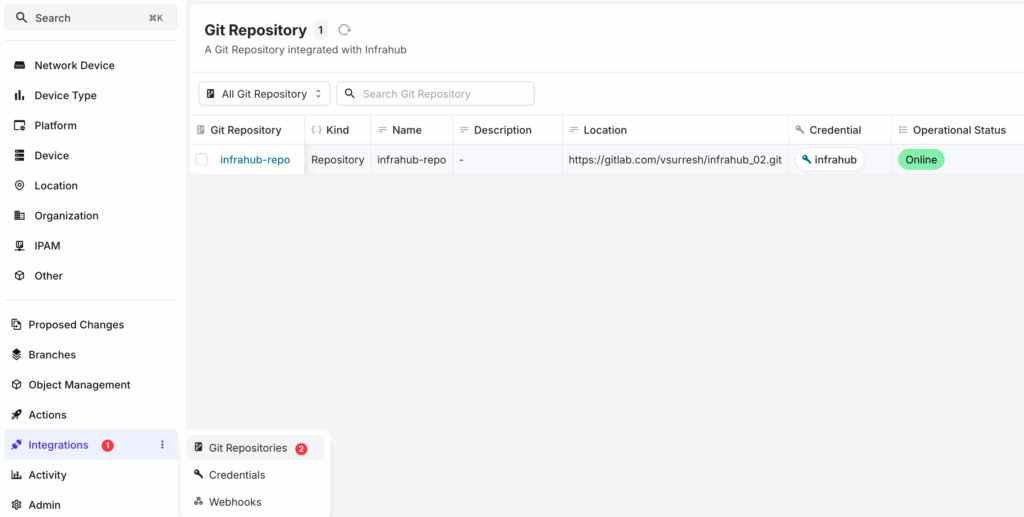
For authentication, you can use an access token generated from platforms like GitHub or GitLab. Once connected, Infrahub will be able to fetch and use the checks defined in that repository as part of your proposed change process.
After connecting the remote repository, you can navigate to Actions > Check Definition in the Infrahub interface. Here, you’ll see the query and the check definitions that were imported from the connected repository. This confirms that Infrahub has recognized your check files and is ready to run them as part of the Proposed Change workflow.
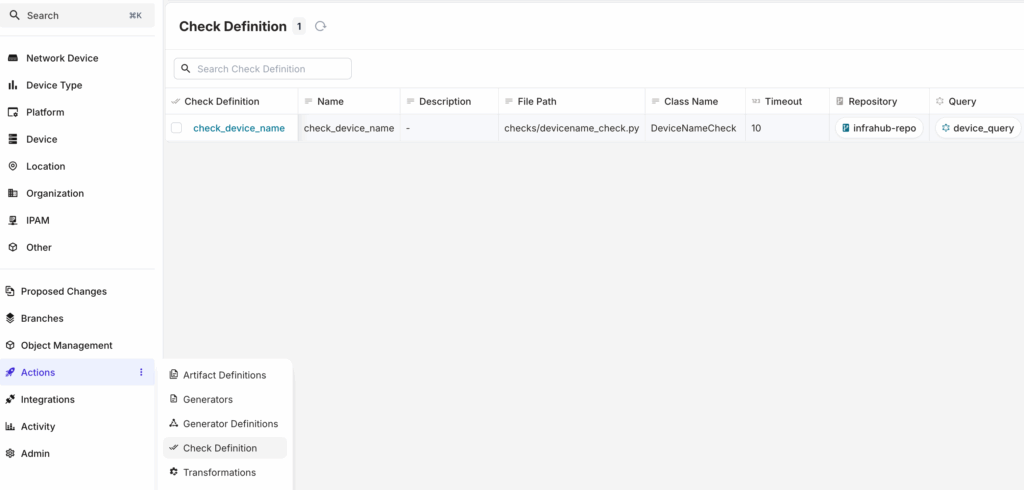
You can also verify that the checks are loaded correctly by running infrahubctl check --list. This command lists all the available checks defined in the connected repository, confirming that Infrahub has detected them.
infrahubctl check --list
Python checks defined in repository: 1
check_device_name (checks/devicename_check.py::DeviceNameCheck) Target: -global-
Testing our checks by making a change
Next, let’s create a new branch called change_name and make two edits. First, rename the existing device from ldn-core01 to ldn-core01-cisco. Then add a new device called ny-edge02-junos. Both names break our naming rule.
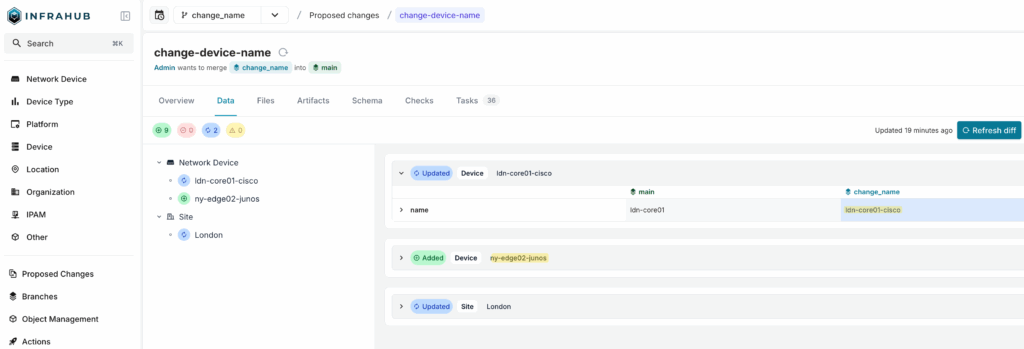
Open a Proposed Change from this branch and check the Checks tab. You’ll see the device name check fail, with clear messages showing which names don’t match the required pattern. This confirms the check is working and prevents invalid names from being merged into main.
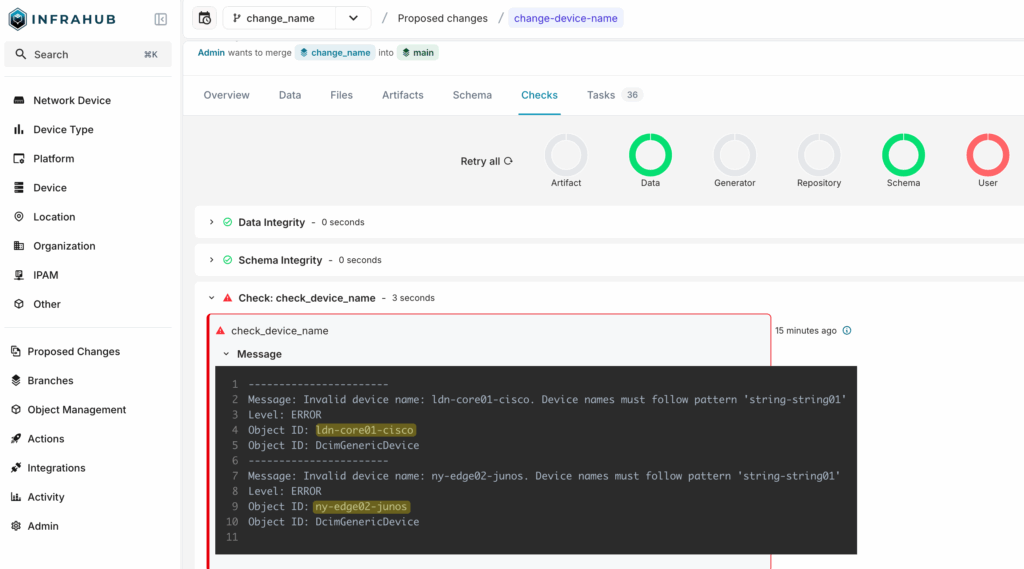
You can also run the checks locally using the infrahubctl check command. This allows you to test and validate the checks on your branch to make sure they work as expected before creating a proposed change or starting the review process in the Infrahub GUI.
infrahubctl check check_device_name --branch=change_name
INFO     HTTP Request: POST http://infrahub-02.packet.lan:8000/graphql/change_name "HTTP/1.1 200 OK"
ERROR    devicename_check::DeviceNameCheck: FAILED
ERROR    Invalid device name: ldn-core01-cisco. Device names must follow pattern 'string-string01'
ERROR    Invalid device name: ny-edge02-junos. Device names must follow pattern 'string-string01'
Closing up
To wrap up, Infrahub’s change management workflow gives you a reliable way to manage both data and schema changes.
If you’re adding a new device, updating an attribute, or modifying the schema itself, every change follows the same process: You create a branch, make your updates, review the diff, run the checks, and then propose and merge the change.
This workflow adds control and visibility while bringing the same discipline from software version control into infrastructure management. By using branches and Proposed Changes, you can experiment, validate, and review updates safely before they reach production.
If you haven’t tried it yet, explore the Infrahub sandbox or set up your own instance to see how this workflow fits into your infrastructure operations. It’s a simple and reliable way to keep your infrastructure data accurate, consistent, and easy to maintain.
