
How often do you find yourself repeating the same steps when deploying something in your network?
Every time you need to add a new site, onboard a device, or provision a service, you end up creating the same set of objects, connecting them, and allocating resources. The steps are predictable, but you still have to do them manually each time.
This is exactly the problem Infrahub Generators are designed to solve. Instead of repeating the same work over and over, you define the logic once and reuse it whenever needed. You tell Infrahub what objects to create, how they should relate to each other, and what data to use.
The next time you need to deploy something, the Generator runs and creates the required resources automatically. You no longer have to worry about missing a step or doing things differently each time.
What we'll cover
In this post, we'll start with the basics of how Generators work. We'll look at the key components that make up a Generator and how they fit together. Then we'll walk through a simple example of automated network provisioning to see Generators in action.
This post is based on Infrahub v1.7.0, but you can follow along if you're on a different version. This post assumes you're somewhat familiar with Infrahub, the Python SDK, and the CLI tool infrahubctl.
If you're new to Infrahub, don't worry. You can still follow along. We'll keep the example simple, so it's easy to understand and follow.
How do Infrahub Generators work?
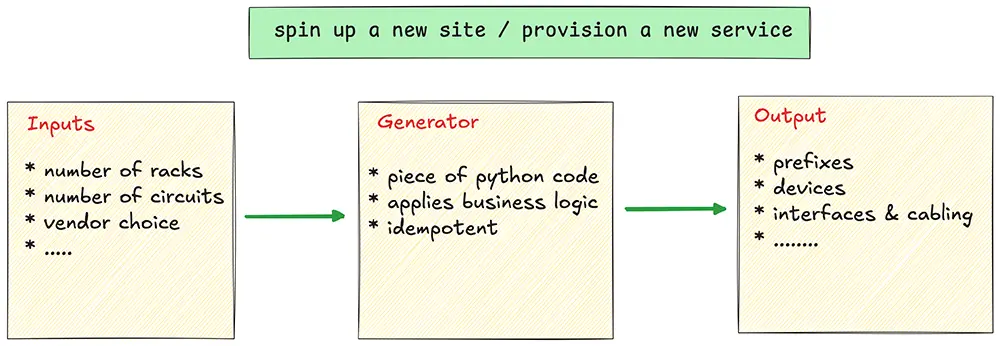
An Infrahub Generator is a piece of Python code that takes a high-level request and translates it into a full technical implementation. Spinning up a new site, provisioning a service or onboarding a customer, the Generator combines your input with the logic you define and creates all the necessary objects automatically.
For example, let's say you need to provision a dedicated Internet circuit for a customer. You may need to allocate a VLAN from your pool, create a BGP session with the customer's ASN, assign interface IPs, configure the edge router and so on.
Doing this manually, you'ld have to touch multiple components and create each object manually. With a Generator, you capture that entire workflow once.
The next time a customer orders a dedicated circuit, you just create the service request, and the Generator manages the rest. This could even be triggered automatically through a self-service portal or a service catalog, removing any manual steps entirely.
There are four main components that make up a Generator. We'll cover them in detail with examples as we go through this post.
- The generator definition specifies what your Generator does. This is where you name your Generator, point to your Python file, and define which group it targets.
- The group defines which objects trigger your Generator. When you assign objects to a Generator's target group, those objects become inputs for automation.
- A GraphQL query defines the input data your Generator needs. Infrahub executes your query and passes the results to your Generator.
- Business logic is where you define the rules for what gets created. This is the Python code that uses Infrahub's SDK to create objects, update relationships, and allocate resources.
When you run the Generator, Infrahub loops through each object in the target group, runs your query to fetch the relevant data, and then executes your Python logic to create the new objects.
You can also trigger a Generator individually for a specific object, either manually or via event triggers. With Generators, you define the logic once. The next time you need to deploy something, you just create the trigger object and run the Generator. Everything else is managed automatically.
Generators are designed to be idempotent, meaning we can run them multiple times without creating duplicates or inconsistencies. When a Generator runs, it updates existing objects as needed and removes anything that's no longer required. However, this depends on how we write the Python code. If we break idempotency in our logic, the Generator may produce unexpected results.
Example scenario for automated network provisioning
Imagine you work at Otter Bank, a small but rapidly growing bank. You and your team have been tasked with rolling out 100 new branch offices over the next six months. To deliver this project efficiently, you want to use a cookie-cutter approach and use the same type of hardware across all locations.
The design can change per site; one branch could have two ISPs, another might have just one. We might have a different number of switches or firewalls depending on the size of the office. But at the core, each branch typically follows the same design patterns. The steps are predictable, and we should have an automated way to provision them instead of doing everything manually each time.
To keep the example simple, we'll look at how to provision a new site with a parent prefix, two subnets, and a pair of firewalls with allocated management IPs. Once you understand how this works, you can expand the logic to handle more complex scenarios.
Our goal is that when we need to provision a new network site, we simply create an Infrahub branch (similar to a Git branch) and add the site we want. That's it. The Generator takes care of everything else.
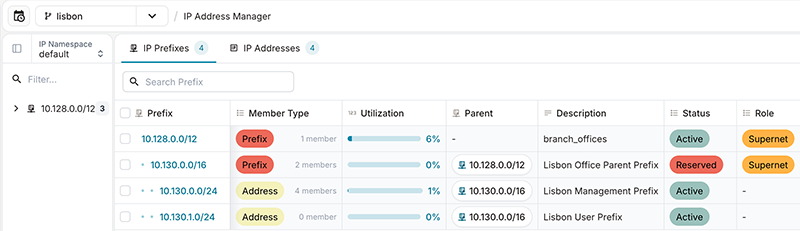
Based on the logic we define, the Generator allocates a /16 parent prefix from Otter Bank's IP pool, creates two /24 subnets inside it for management and user traffic, provisions two firewalls, and assigns management IPs to each firewall. All of this happens automatically without any manual intervention.
For Otter Bank, this means you can focus on the physical rollout while the Generator handles all the IP allocations and device provisioning. Rolling out 100 sites in six months no longer means repeating the same steps 100 times. We just create the sites and let the Generator do the heavy lifting.
Set up the baseline for the Generator
First, we need a running Infrahub instance. We've covered Infrahub installation in multiple posts, so we're not going to go over the basics here. The Infrahub documentation has guidance if you need it.
You'll also need to install the infrahubctl CLI tool. This is a command-line utility that lets you interact with the Infrahub programmatically.
uv add 'infrahub-sdk[all]'
source .venv/bin/activate

export INFRAHUB_ADDRESS=http://localhost:8000
export INFRAHUB_API_TOKEN="06438eb2-8019-4776-878c-0941b1f1d1ec"
Next, we will import some schemas. Infrahub has a Schema Library that provides pre-built schemas for common use cases. For this example, we'll import the base schema and a minimal location schema.
git clone https://github.com/opsmill/schema-library.git

infrahubctl schema load schema-library/base/
infrahubctl schema load schema-library/extensions/location_minimal/
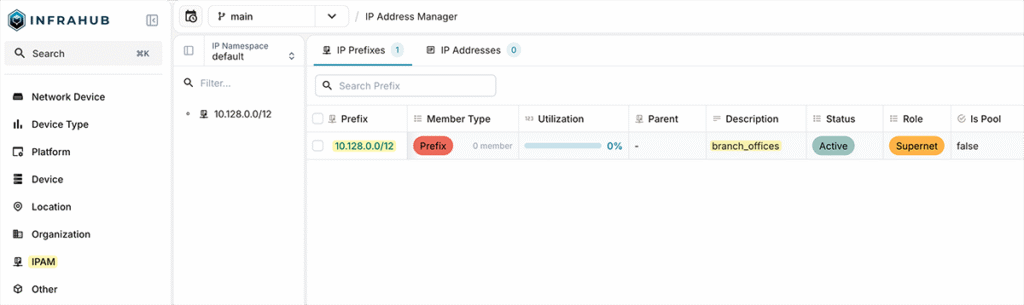
Next, we'll create a supernet for all the branch sites. The idea is that we allocate a /12, and each site will get its own /16 from this parent pool. You can create this using a number of methods, but let's just do it from the Infrahub GUI by navigating to IPAM. For this example, we'll create 10.128.0.0/12 as our supernet.
Create a group for the Generator
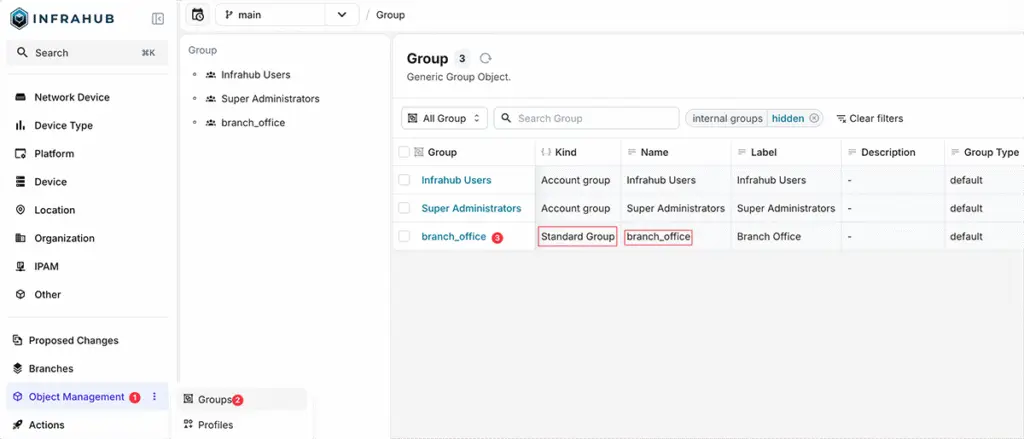
Next, we need to create a group. As we covered earlier, the Generator runs against objects that are members of a specific group. Let's create a group called branch_office and later add our sites to this group.
You can create the group in multiple ways. To create it via the GUI, navigate to Object Management and then Groups. From here, select Standard Group as the Kind, give it a Label and leave everything else at the defaults.
You can also use infrahubctl to load it from a YAML file rather than creating the group via the GUI. To do that, create a file (objects/01_groups.yml) with the following content:
---
apiVersion: infrahub.app/v1
kind: Object
spec:
  kind: CoreStandardGroup
  data:
    - name: branch_office
Then run the following command to load it:
infrahubctl object load objects/01_groups.yml
Create a resource pool for the Generator
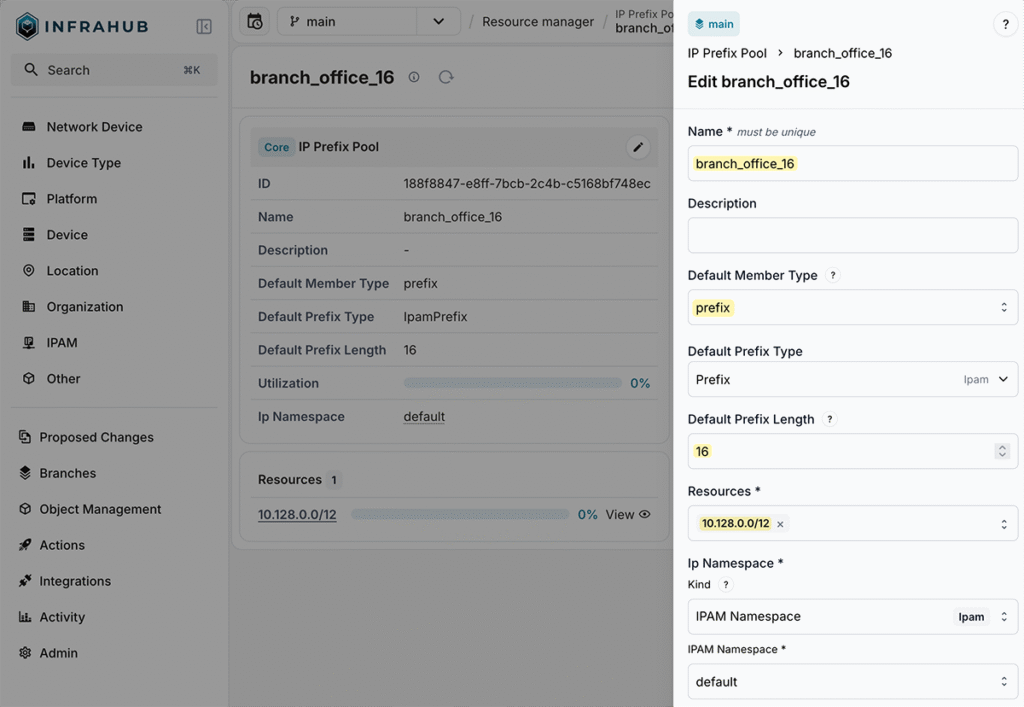
Next, and finally for the baseline configuration, we need to create a resource pool in Infrahub's Resource Manager. The Resource Manager can automatically allocate resources from a pool. In our case, we want it to allocate the next available /16 prefix from the parent /12 pool whenever we provision a new network site.
When our Generator asks for a new prefix, the Resource Manager finds the next available /16 from 10.128.0.0/12 and allocates it.
To create a new pool, navigate to Object Management, then Resource Manager, and create a new IP prefix pool. We'll name it branch_office_16, set the default prefix length to 16, and add the 10.128.0.0/12 prefix as the resource.
Create a GraphQL query
For the Generator to do its job, it needs information about the target object it's operating on. The GraphQL query provides exactly that, fetching the relevant input details the Generator requires.
In our case, when the Generator runs for a site, it needs to know the site's name and shortname. The name is used to create descriptions and name the prefixes and pools. The shortname is used for naming the firewall. Without this query, the Generator would have no information about the site it's provisioning.
query SiteQuery($shortname: String!) {
  LocationSite(shortname__value: $shortname) {
    edges {
      node {
        __typename
        id
        name {
          value
        }
        shortname {
          value
        }
      }
    }
  }
}
The query (queries/SiteQuery.gql) takes the shortname as a parameter and returns the site's id, name, and shortname. This data is then passed to the Generator class, which uses it to create all the necessary objects.
Create the .infrahub.yml configuration file
So we created a GraphQL query, and we'll also work on the Generator class shortly. But before that, let's look at the configuration file that ties everything together.
The .infrahub.yml file is a central manifest that Infrahub uses to understand how all the pieces fit together. It tells Infrahub where to find the GraphQL query, where the Generator class lives, what group to target, and how to pass parameters between them.
Think of it as the glue that connects your query, your Generator logic, and your target objects. This file is also used for other purposes, like Transformations and checks. For now, we'll start the .infrahub.yml file with the query we created in the previous section.
---

queries:
  - name: BranchSiteQuery
    file_path: queries/SiteQuery.gql
So far, we've created the .infrahub.yml file and the GraphQL query. Here's how our directory looks at this point. (We're working on a directory called infrahub_generator)
infrahub_generator/
├── .infrahub.yml
└── queries/
    └── SiteQuery.gql
Build the Generator
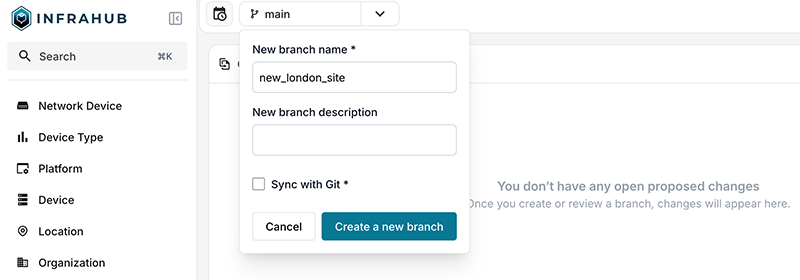
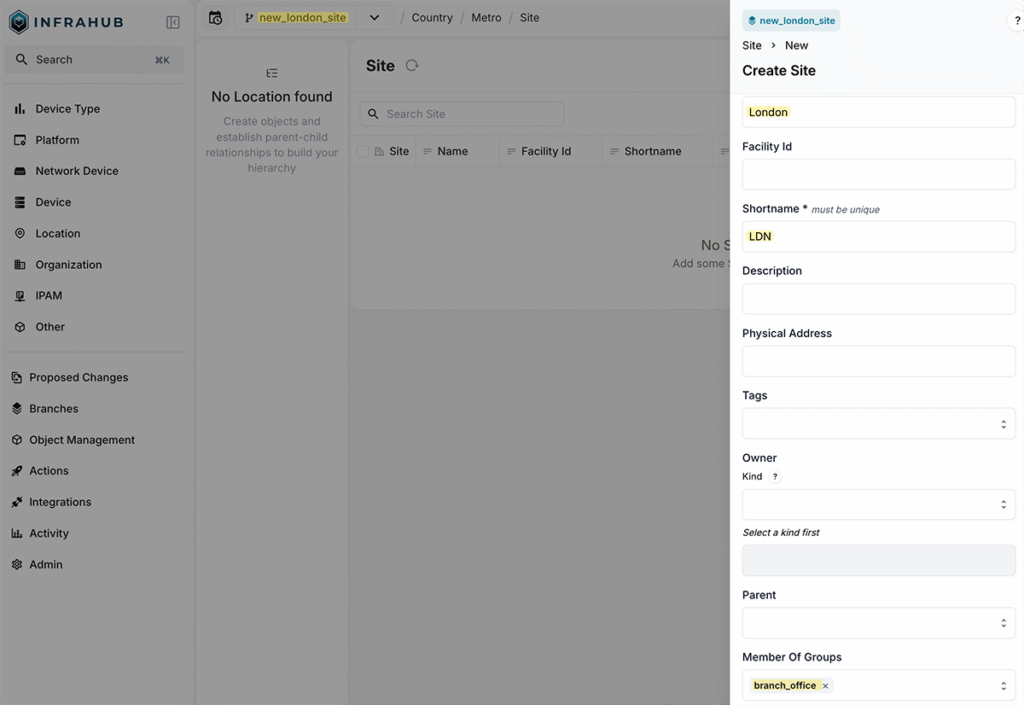
Before we dive into the Generator code, let's first create the site we want to provision. Start by creating a new Infrahub branch. We'll call it new_london_site.
Navigate to Location and create a new site. Set the name to London and the shortname to LDN. The most important thing here is to add the site to the branch_office group we created earlier. Without this, the Generator won't pick up the site.
You can also automate this step using event rules and actions. For example, you can define a trigger rule that automatically adds a site to the branch_office group whenever a new site is created.
Now the fun part: working on the Generator class. This is where we define the logic for what gets created when we provision a new site. Here's what we want the Generator to do:
- Allocate the next available
/16prefix from the top-level IP prefix pool (10.128.0.0/12) we created earlier. - Create a new IP prefix pool from that
/16so it can allocate/24subnets from it. - Allocate two
/24subnets from the pool, one for Management and one for User subnets. - Create an IP address pool from the Management subnet.
- Reserve the first two available IPs from the Management pool.
- Provision two firewall devices and allocate two more management IPs for them.
The point of creating these pools is to make the allocation dynamic. We want to avoid creating anything manually or hardcoding values.
For example, if we have 10.128.0.0/16 allocated to a site, we could hardcode 10.128.0.0/24 for Management and 10.128.1.0/24 for User. But instead of doing that, we create an IP prefix pool from the /16 using the Resource Manager and then ask it to give us the next two available /24s. The pool handles the allocation for us.
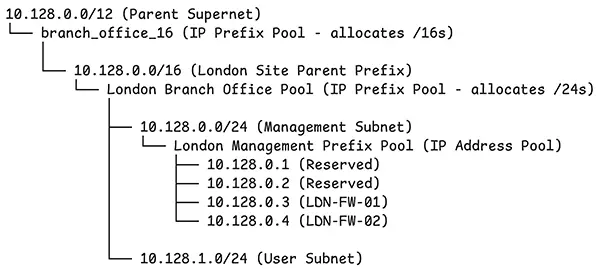
The same goes for management IPs. Rather than manually assigning 10.128.0.3 to the first firewall and 10.128.0.4 to the second, we create an IP address pool from the Management subnet and let it allocate the next available addresses. This way, everything stays dynamic and consistent, no matter how many sites we provision.
Now, let's look at the Generator itself. Don't worry too much about the code. It's simpler than it looks, and we'll walk through it step by step.
generators/BranchSite.py
from __future__ import annotations
from infrahub_sdk.generator import InfrahubGenerator

DEFAULT_RESOURCE_POOL = "branch_office_16"

SITE_PREFIXES = [
    { "name": "Management Prefix", "status": "active", "member_type": "address", "prefix_length": 24, "pool": True},
    { "name": "User Prefix", "status": "active", "member_type": "address", "prefix_length": 24, "pool": False}
]

class BranchGenerator(InfrahubGenerator):
    async def generate(self, data: dict) -> None:
        location = self.nodes[0]
        resource_manager = await self.client.get("CoreIPPrefixPool", name__value=DEFAULT_RESOURCE_POOL)

        parent_prefix = await self.client.allocate_next_ip_prefix(
            resource_pool=resource_manager,
            identifier=location.name.value,
            data={
                "description": f"{location.name.value} Office Parent Prefix",
                "location": location.id,
                "status": "reserved",
                "role": "supernet",
                "member_type": "prefix"
            }
        )

        branch_office_pool = await self.client.create(
            kind="CoreIPPrefixPool",
            name=f"{location.name.value} Branch Office Pool",
            default_prefix_length=24,
            default_prefix_type="IpamPrefix",
            ip_namespace={"hfid": ['default']},
            resources=[parent_prefix]
        )

        await branch_office_pool.save(allow_upsert=True)

        for prefix in SITE_PREFIXES:
            office_subnet = await self.client.allocate_next_ip_prefix(
                resource_pool=branch_office_pool,
                identifier=f"{location.name.value} {prefix['name']}",
                prefix_length=prefix["prefix_length"],
                data={
                    "description": f"{location.name.value} {prefix['name']}",
                    "location": location.id,
                    "status": prefix["status"],
                    "member_type": prefix["member_type"],
                    "prefix_length": prefix["prefix_length"]
                }
            )
            if prefix["pool"]:
                ip_pool = await self.client.create(
                    kind="CoreIPAddressPool",
                    name=f"{location.name.value} {prefix['name']} Pool",
                    default_address_type="IpamIPAddress",
                    default_prefix_length=32,
                    resources=[office_subnet],
                    ip_namespace={"hfid": ['default']},
                )
                await ip_pool.save(allow_upsert=True)

                # Reserver first 2 IP addresses for gateway and network devices
                for i in range(2):
                    await self.client.allocate_next_ip_address(
                        resource_pool=ip_pool,
                        identifier=f"Reserved for {prefix['name']} {i+1}",
                        data={"description": f"Reserved IP {i+1} for {prefix['name']}"}
                    )

        # Creating two firewalls
        management_pool = await self.client.get("CoreIPAddressPool", name__value=f"{location.name.value} Management Prefix Pool")

        for i in range(1, 3):
            device = await self.client.create(
                kind='DcimDevice',
                name=f"{location.shortname.value}-FW-{i:02d}",
                status='active',
                device_type={'hfid': 'PA-440'},
                platform={'hfid': 'PAN-OS'},
                primary_address=management_pool,
                location=location.id,
            )
            await device.save(allow_upsert=True)
We start by importing the InfrahubGenerator class from the SDK. This is the base class that the generator inherits from. We also define a couple of constants at the top.
DEFAULT_RESOURCE_POOL is the name of the pool we created in the Resource Manager earlier (the top-level /12 prefix). We could also take this further by adding a relationship to the pool on the site object itself, making the Generator more flexible by allowing different sites to use different resource pools.
Next, SITE_PREFIXES is a list that defines the subnets we want to create for each site. Each entry specifies the name, status, prefix length, and whether we should create an IP address pool from it.
The BranchGenerator class inherits from InfrahubGenerator and implements the generate method. This is the method that Infrahub calls when running the Generator. It receives a data parameter which contains the result of the GraphQL query.
The first thing we do inside the generate method is access the target object. When the Generator runs, it populates self.nodes with the objects returned by the query. Since we're querying a single site, we grab the first item with self.nodes[0]. This gives us access to the site's attributes like name and shortname. Note that the GraphQL query must include id and __typename fields for this to work.
Next, we fetch the resource pool using self.client.get(). This retrieves the CoreIPPrefixPool we created earlier, called branch_office_16. With the resource pool in hand, we call allocate_next_ip_prefix() to get the next available /16 from the pool. We pass in an identifier (the site name) and additional data like the description, location, status, and role. When we specify an identifier, we can run allocate_next_ip_prefix() multiple times, and it will not allocate additional prefixes. The identifier ensures idempotency.
Once we have the parent /16 prefix for the site, we create a new IP prefix pool specific to this branch office. This pool will be used to allocate the /24 subnets. We use self.client.create() to create the pool object. We then loop through the SITE_PREFIXES list to create the two /24 subnets. For each entry, we allocate a prefix from the pool we just created. If the entry has pool set to True, we also create an IP address pool from that subnet. In our case, only the Management subnet gets an IP address pool. We then reserve the first two IPs from the Management pool by calling allocate_next_ip_address().
Finally, we provision the two firewall devices. Instead of manually allocating an IP address and then assigning it to the device, we can simply pass the Management pool directly to the primary_address field. Infrahub is smart enough to allocate the next available IP from the pool automatically. The device names use the site's shortname, so for London, they would be LDN-FW-01 and LDN-FW-02.
Update the .infrahub.yml file
Now that our Generator is ready, we can update the .infrahub.yml file to include the Generator definition. We add a generator_definitions section that tells Infrahub everything it needs to know about our Generator.
---

queries:
  - name: BranchSiteQuery
    file_path: queries/SiteQuery.gql

generator_definitions:
  - name: generate-branch-site
    file_path: generators/BranchSite.py
    query: BranchSiteQuery
    targets: branch_office
    parameters:
      shortname: shortname__value
    class_name: BranchGenerator
    convert_query_response: true
The name gives the Generator a unique identifier. The file_path points to the Python file containing our Generator class. The query references the GraphQL query we defined earlier. The targets specify which group the Generator should run against, in our case branch_office.
The parameters section maps the query variable to the object attribute. Here we're saying that the shortname parameter in our GraphQL query should be populated with the shortname__value from the target object. This is how Infrahub knows to pass the site's shortname when running the query.
The class_name tells Infrahub which class to instantiate from the Python file. Finally, convert_query_response set to true means the query response will be automatically converted into node objects, which is why we can access self.nodes in our Generator class. Here's how our directory structure looks now with all the pieces in place.
infrahub_generator/
├── .infrahub.yml
├── generators/
│   └── BranchSite.py
└── queries/
    └── SiteQuery.gql
Test and verify the Generator
Now let's test running the Generator and see it in action. There are multiple ways to run the Generator. Let's start with the infrahubctl command.
infrahubctl generator generate-branch-site shortname=LDN --branch new_london_siteThis command tells Infrahub to run the Generator called generate-branch-site. We pass in the shortname LDN, which gets passed to our GraphQL query to fetch the London site. The --branch flag specifies which Infrahub branch to run against. Remember, we created the new_london_site branch earlier and added the London site to it.
When you run this command, the Generator kicks off and creates all the objects we defined in our logic. It allocates the /16 prefix from the parent pool, creates the branch office pool, allocates the two /24 subnets, creates the Management IP address pool, reserves the first two IPs, and provisions the two firewalls with their management IPs. All of this happens automatically based on the logic we captured in the Generator class.


And that's it. With a single command, we provisioned an entire branch office. All we had to do was create the site and let the Generator manage the rest.
Please note that we hardcoded the platform and device type in the Generator for the sake of simplicity. Ideally, you want to pass these as inputs or build logic to determine the right platform and device type based on the site requirements.
Think about what we just achieved. We allocated prefixes, created pools, reserved IPs, and provisioned firewalls without manually touching any of those objects. If you need to add more logic, like creating interfaces, adding more devices, setting up upstream ISP connections, or defining cabling, you just add it to the Generator. The next time you spin up a site, all of that gets created automatically.
Running the Generator in the Infrahub GUI
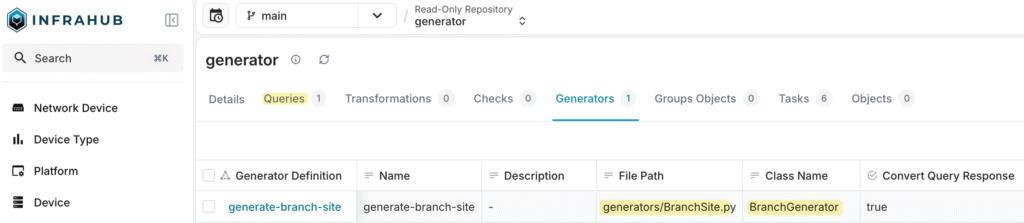
So, we've seen how to kick off the Generator from the CLI using infrahubctl, but there are other ways to do this. Our current directory structure with all the files can be put into a Git repository, and you can then add the repository to Infrahub. Once you add that repository to Infrahub, it will import the Generator and queries automatically. From there, you can trigger the Generator by just clicking a button in the GUI.
To do that, I created a Git repository in GitLab (it can be any Git provider), created an authentication token, added the token to Infrahub credentials, and then added the Git repository. You can add a Git repository to Infrahub by navigating to Integrations and then Git Repositories. (The Infrahub documentation has more detail about working with Git repositories if you need it.)
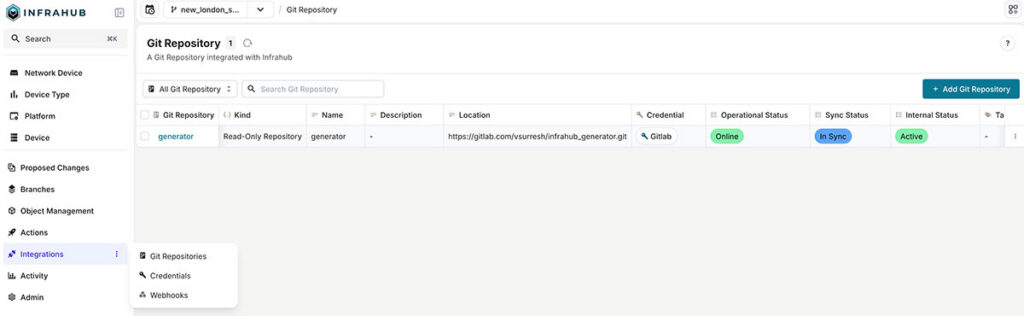
Now, if you open the Git repository we just added, you can see the Queries and the Generators listed. If you also have Transformations or Checks defined in your repository, they'll show up here as well.
Now let's go and create a new Infrahub branch and add a new site called New York with the shortname NY to that branch. Make sure to add the site to the branch_office group.
Then navigate to Actions, then Generator Definitions, and select the Generator we imported in the previous step. You'll see a Run button at the top right. Click on it and under Select target nodes, select the New York location we just created.
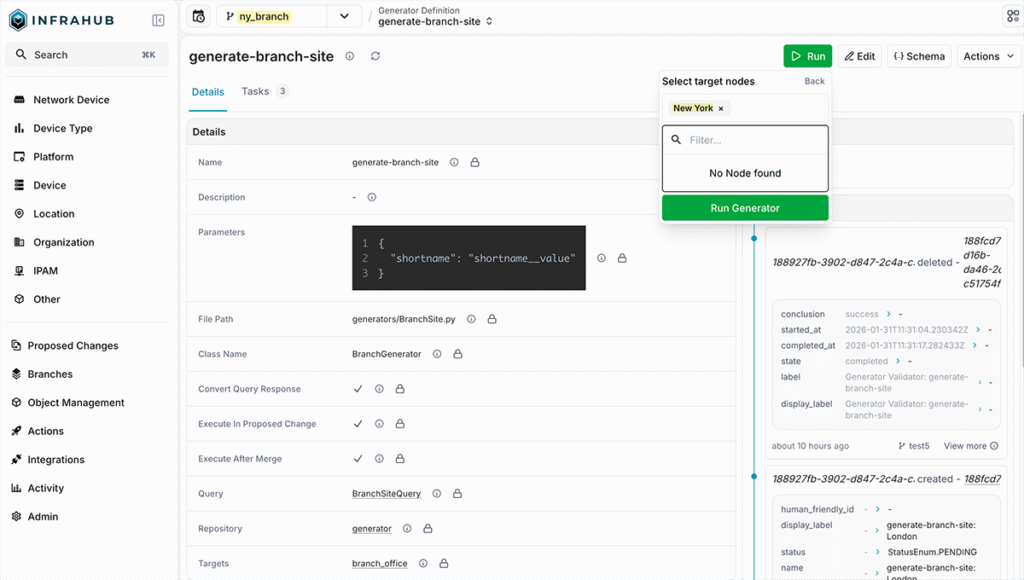
Finally, click Run Generator, and the Generator will kick off and create all the resources for the new site.

We can also run Generators by enabling events and actions. This allows the Generator to run automatically as soon as we create a site, without needing to manually run it.
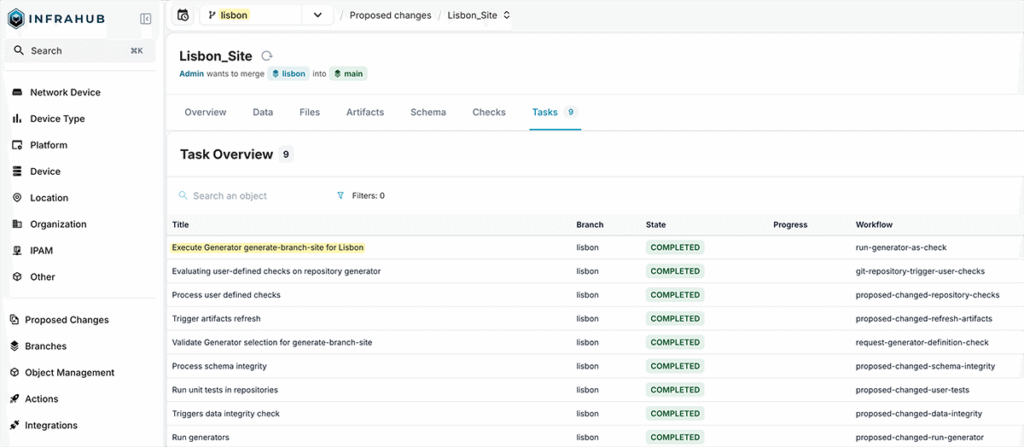
Running Generators as part of Proposed Changes
There's yet another way to kick off a Generator: using Proposed Changes. A Proposed Change is similar to a pull request in Git. It lets you review changes made in a branch before merging them into the main branch. You can see what was added, modified, or deleted, and run checks and validations before the changes go live.
Using Proposed Changes, you can create an Infrahub branch, add a new site, then create a Proposed Change. The Generator will run automatically as part of the pipeline without you having to do anything. In the Tasks tab, you can see the Generator being executed along with other checks and validations.
Building from here
That's it for this post. We covered what Generators are, how they work, and walked through a simple example of automated network provisioning for new branch offices. The key takeaway is that Generators let you capture repetitive workflows once and reuse them whenever needed.
This was a simple example to get you started, but you can extend the logic to handle much more complex scenarios. Add interfaces, configure routing, and the possibilities are endless. As always, start small, experiment, and build from there.
