
Have you ever had two teams accidentally assign the same IP address? Or heard someone ask, "Can I get a VLAN? I'm not sure which one to use."
I’m also certain you have because manually managing infrastructure resources like IP addresses, IP prefixes, VLAN IDs, and BGP ASNs is still all too common in a lot of environments.
Manual resource management is also time-consuming and painful, and often results in duplicate resource assignments, which means more work to clean things up later.
The Infrahub Resource Manager is designed to eliminate those pains while speeding up your workflows. The Resource Manager automatically hands out resources from managed pools and ensures every allocation is tracked and unique.
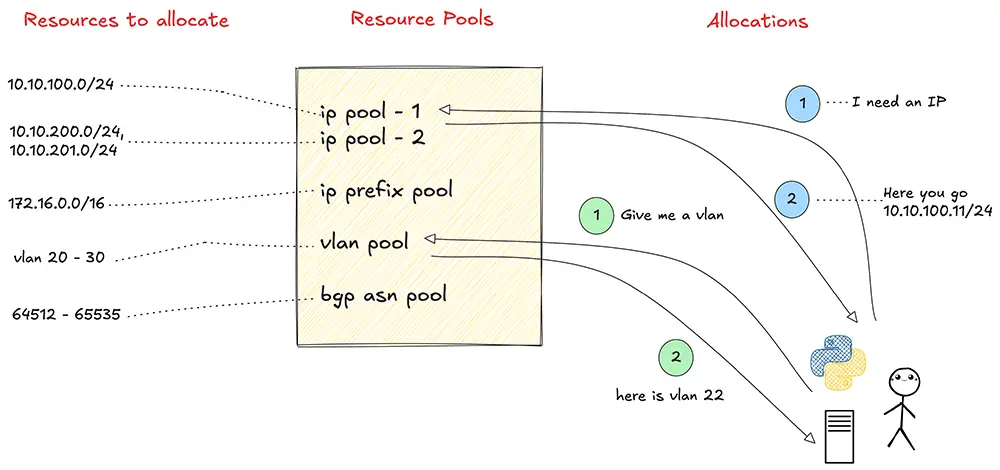
In this guide, we'll show you how the Infrahub Resource Manager works and give you three ways to build pools and allocate resources with it.
Common use cases for the Infrahub Resource Manager
The Resource Manager can be used in many areas of network design and automation.
A common use case is data center expansion, where you might allocate /31 prefixes for point‑to‑point links in a consistent and automated way. This might seem like a small thing, but it saves so much time. How often do you find yourself fumbling across multiple documents just to find the next available block, or asking someone what you’re supposed to use?
Another use case is device provisioning, where loopback IPs or management IPs can be automatically assigned during device creation. If you’re providing some service to a client, you may onboard multiple clients, and you’d probably set up BGP sessions with them. In that case, you could automatically allocate a /31 IP and a BGP ASN for them from the pool. You may also have an automated process that provisions this service for the client. By relying on the Resource Manager, you reduce the complexity of that process and make it idempotent.
VLAN management is another good example, as using a pool helps prevent VLAN ID conflicts across different network segments. Resource Manager also works very well with computed attributes, which allows you to generate more complex values automatically. We won’t cover computed attributes in this post, but will look at them in more detail in a future post.
Using the Infrahub Resource Manager from the GUI
I’m pretty sure many of you have been in a situation where you’re adding a new device to your network, and you need a management IP assigned to that device. Put your hand up if you had to look in an Excel spreadsheet or at a Confluence page to figure it out. Don’t worry, no judgment here. I’ve done that too.
Instead of manually working out which IP you can safely assign, you can let Infrahub handle it. As always, we’ll use the Infrahub sandbox for the example, which you can use to follow along and get some hands-on experience.
Step 1: Create an IP prefix
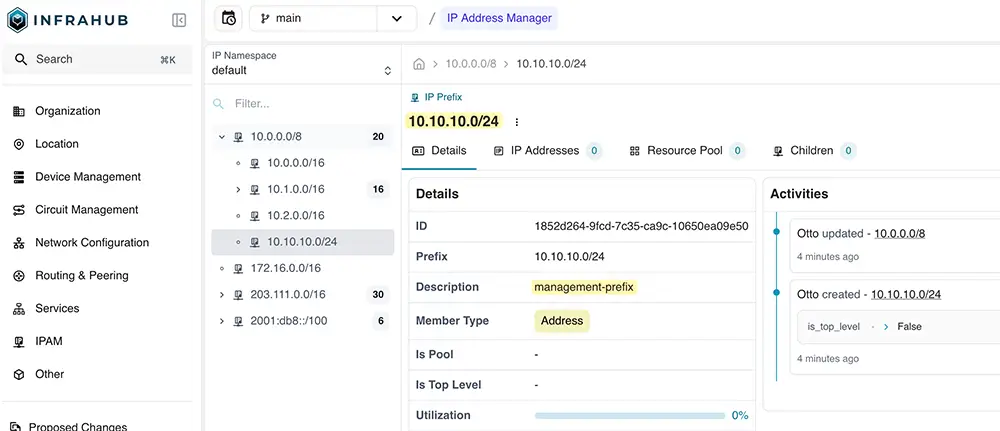
The first step to configuring the Resource Manager is to create an IP prefix. In this example, we will use 10.10.10.0/24 and call it management-prefix, assuming that devices in our network will get their IP addresses from this prefix.
To create a new prefix, navigate to IPAM > IP Prefixes and click Add IP Prefix.
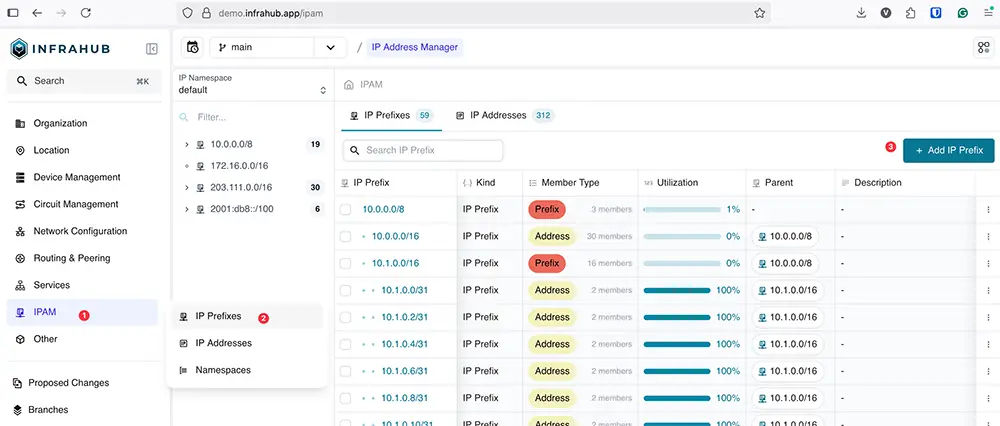
Enter the prefix 10.10.10.0/24, give it the description management-prefix, and set the member type to Address. Once done, click Save.
Step 2: Create a resource pool
The next step is to create a resource pool that allocates addresses from the prefix we created earlier.
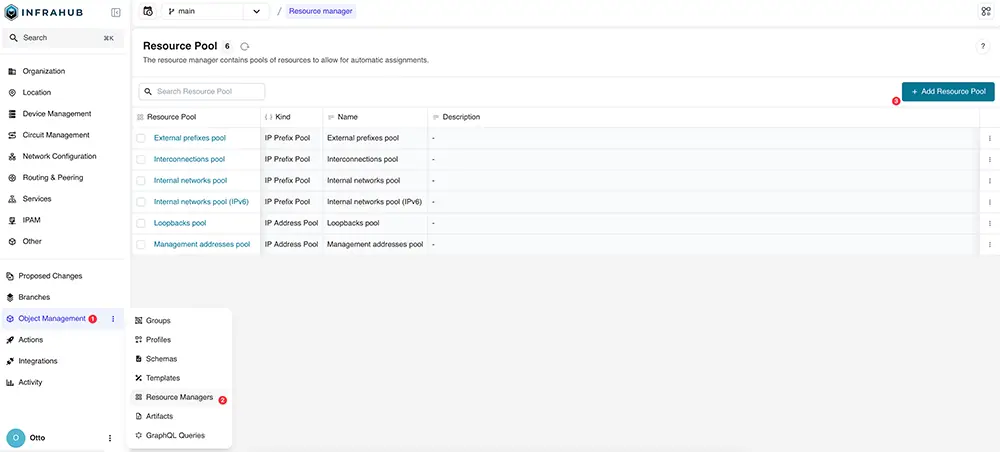
From the menu, go to Object Management > Resource Managers. Click Add Resource Pool.
In the form that opens, choose the following options:
- Select an object type: Set this to IP Address Pool
- Name: Enter a name for your pool, for example, management-ip-pool
- Default Address Type: Choose IP Address
- Default Prefix Length: 24
- Resources: Select the prefix we created earlier:
10.10.10.0/24 - IP Namespace: Keep it as the default

Once all fields are filled in, click Save. This creates a resource pool that will manage and allocate addresses from the 10.10.10.0/24 network.
Step 3: Allocate a resource out of the pool
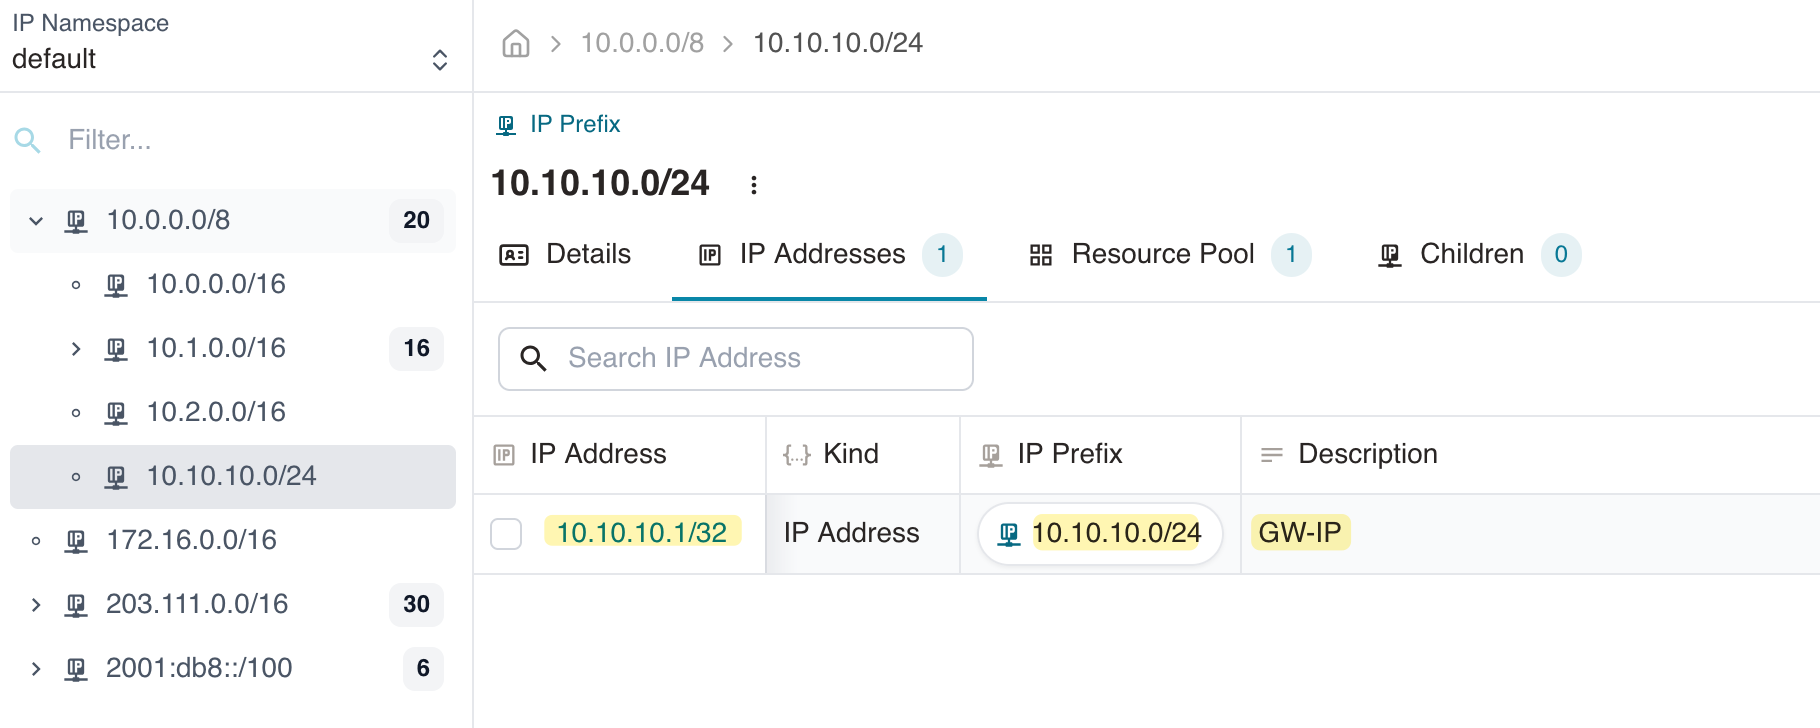
Before we look at how to allocate from the pool, I want to point out that you can still create an IP address manually, just like you normally would.
For example, I created 10.10.10.1 for the gateway as shown here. It simply means you always have the option to manage certain addresses yourself when needed.
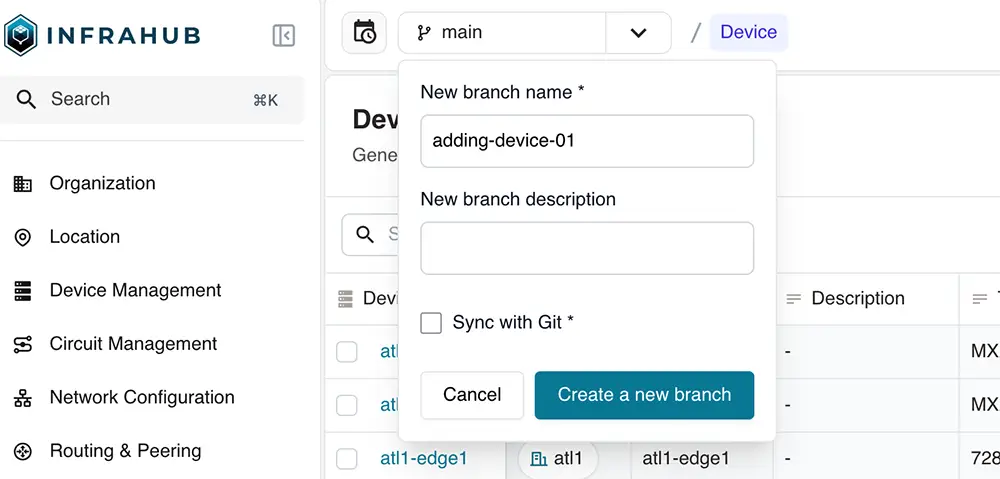
Now, let’s create a new device in Infrahub. But instead of adding it directly to the main branch, we’ll use Infrahub’s branch feature. A branch is an isolated place where you can safely make changes, test things out, and merge them back when you’re ready (similar to how Git operates).
Create a new branch by clicking the branch menu and selecting Create a new branch. Name it adding-device-01.
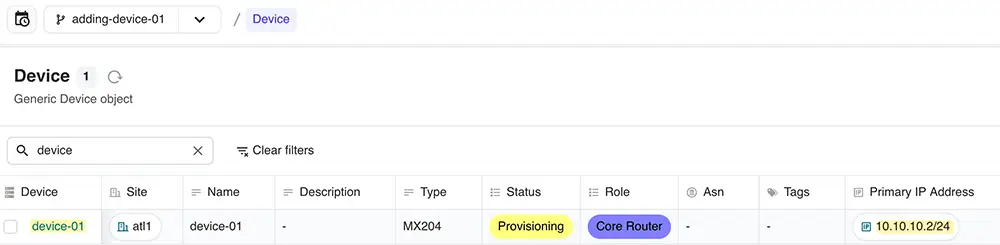
Next, go to Device Management > Device and click Add to create a new device. Fill in the details as shown in the figure below.
For Primary IP Address, instead of typing an address manually, choose the pool management-ip-pool we created earlier.

When you save, Infrahub will allocate the next available IP from the pool and assign it to the new device. In this example, the device device-01 was automatically assigned 10.10.10.2/32 from the pool.
Resource pools are branch-agnotic
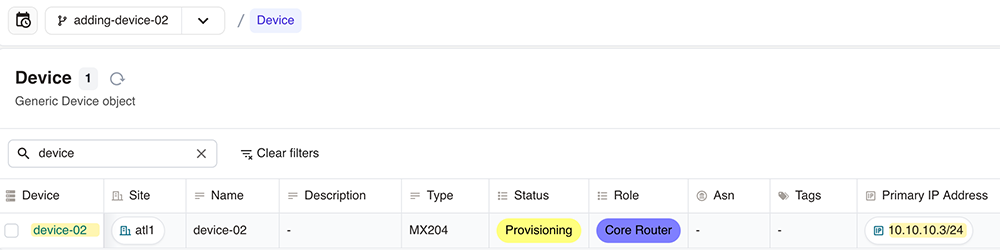
You might be thinking, what happens if someone else creates a new branch and also tries to allocate a new IP? Infrahub handles this well because resource pools are branch-agnostic. Even if you’re on another branch, the pool knows which addresses have already been allocated and will hand out the next available one.
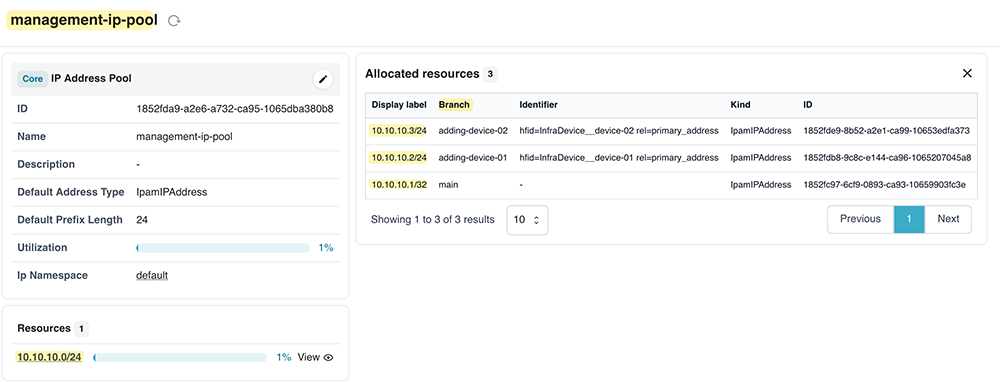
In this example, on a different branch named adding-device-02, we created another device, and Infrahub automatically assigned 10.10.10.3/32 from the same pool without any conflicts.
Viewing resource pool allocations
At any time, you can view all your allocations and see which branch they were assigned from.
To do this, go to the Resource Manager and open your resource pool. You’ll see a list of allocated addresses along with the branch name and identifier (we’ll cover the identifier later in the post). This makes it easy to track exactly where each IP came from and how it’s being used.
Using the Infrahub Resource Manager with Python SDK
So far, we’ve seen how to set up and use resource pools through the GUI, clicking through menus and filling in forms. That works fine when you’re setting things up for the first time or making a quick change. But in most environments, you quickly reach a point where doing everything by hand becomes slow and error‑prone.
Since we talk a lot about automation, it makes sense to look at how you can do the same tasks with the Python SDK. Using the SDK means you can script these actions, run them as part of a workflow, or even integrate them into your existing automation tools.
We’ve previously covered using the Python SDK, so if you’re completely new to the SDK, I recommend reviewing that content first. In this post, we’ll skip the basics and focus only on the parts needed to work with the Resource Manager.
Step 1: Create a client object
In this block of code, we connect to the infrahub sandbox instance and create a client object. This client object is what we’ll use for all the operations in the rest of the examples.
from infrahub_sdk import InfrahubClientSync, Config
config = Config(
   address="https://sandbox.infrahub.app",
   username="otto",
   password="infrahub",
)
client = InfrahubClientSync(config=config)
Step 2: Create an IP prefix
The second block creates a new IP prefix 10.10.11.0/24 with member_type set to address. The save() method pushes this new prefix into Infrahub.
prefix = client.create(
   kind="IpamIPPrefix", prefix="10.10.11.0/24", member_type="address"
)
prefix.save()
Step 3: Create an IP address pool
The third block creates a new IP address pool. It references the prefix we just created, sets a default prefix size of 24 and assigns it to the default namespace. After save(), the pool is ready to allocate IPs.
pool = client.create(
   kind="CoreIPAddressPool",
   name="pool-for-management-ip",
   default_address_type="IpamIPAddress",
   default_prefix_size=24,
   resources=[prefix],
   is_pool=True,
   ip_namespace={"id": "default"},
)
pool.save()
Step 4: Allocate IP addresses
The allocate_next_ip_address method allocates the next available IP address from the pool and sets a description using the data argument. The data argument is used to pass attributes and relationships to the allocated resource. In this case, the description of the allocated IP address is being set.
ip_address = client.allocate_next_ip_address(
   resource_pool=pool,
   data={"description": "gateway ip for management network"},
)
Here you may notice that, unlike the earlier example where an IP was allocated as part of creating a device, in this case, the allocation is not tied to any node. The Resource Manager lets you allocate resources in two different ways:
- You can directly allocate a resource from a pool. This is useful when the resource has no relation to other nodes. For example, you might allocate an IP address that will be used by an external system or something you aren’t storing as a node in Infrahub.
- You can allocate a resource as part of a relationship on a node. For example, you can create a device and allocate an IP address from a pool and assign it to the device.
Call idempotent behaviour
Let’s look at a situation where we need idempotent behaviour. Idempotent means if we run the same script multiple times, we get back the same allocated resource instead of creating a new one each time.
ip_address2 = client.allocate_next_ip_address(
   resource_pool=pool,
   identifier="palo-allocated-ip",
   data={"description": "palo management network"},
)
ip_address3 = client.allocate_next_ip_address(
   resource_pool=pool,
   identifier="palo-allocated-ip",
   data={"description": "palo management network"},
)
Here we pass an identifier argument. This identifier links the resource pool with the allocated resource and makes the allocation idempotent. This means if you run the allocation again with the same identifier (like we did above), you’ll always get the same resource back.
Allocate an IP address to a relationship of a node
The next block creates a new device, and instead of manually entering a primary IP address, it references the pool we created earlier.
device = client.create(
   kind="InfraDevice",
   name="device-03",
   type="MX204",
   site="atl1",
   primary_address=pool,
)
device.save()
Please note that when you allocate to a relationship of a node, the resource allocation happens in an idempotent way. An identifier is automatically assigned to the resource allocation in this case.
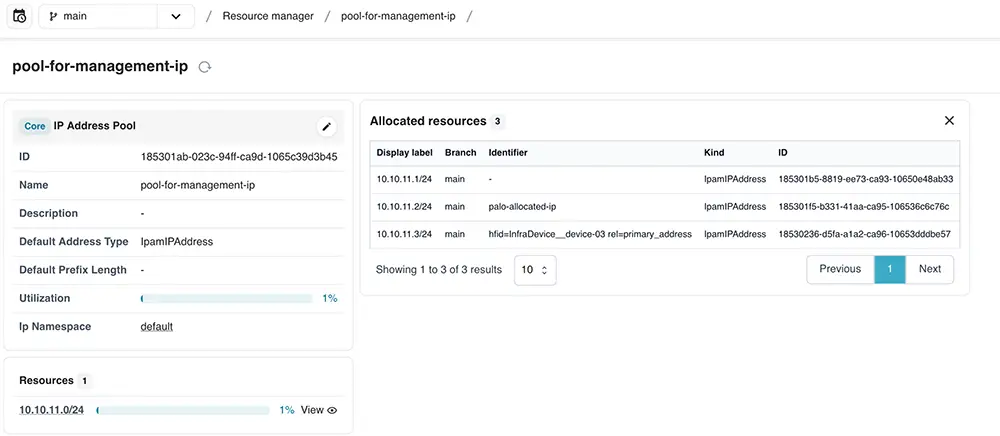
As you can see in the list of allocated resources, the identifier we manually specified in the previous section is shown for 10.10.11.2/24. For the IP that was allocated to the device’s primary address, Infrahub automatically created and assigned an identifier.
Using the Infrahub Resource Manager with GraphQL
We can also interact with the Infrahub Resource Manager using GraphQL. Instead of using the Python SDK or the GUI, we can run GraphQL mutations to create and manage resources.
You can access the Infrahub GraphQL sandbox by clicking on the three dots in the bottom left corner and selecting GraphQL Sandbox from the menu. This opens a built‑in environment where you can run and test GraphQL queries and mutations directly against your Infrahub instance.
The first mutation creates a new IP prefix. We provide the prefix value and the member type. Once this runs successfully, it returns an ID that we use in the next steps. The process is exactly the same as using the GUI or the Python SDK, but here we’re using the GraphQL interface instead.
mutation {
  IpamIPPrefixCreate(
    data: {
      prefix: { value: "10.10.11.0/24" }
      member_type: { value: "address" }
    }
  ) {
    ok
    object {
      id
    }
  }
}
The second mutation creates a new IP address pool. We give the pool a name, specify the default address type and default prefix length, and reference the prefix we just created by using its ID.
mutation {
  CoreIPAddressPoolCreate(
    data: {
      name: { value: "pool-for-management-ip" }
      default_address_type: { value: "IpamIPAddress" }
      default_prefix_length: { value: 24 }
      resources: [
        { id: "1853ae74-51df-c119-ca90-10657adb34db" }
      ]
      ip_namespace: { id: "default" }
    }
  ) {
    ok
    object {
      id
    }
  }
}
The third mutation allocates an IP address from the pool. Here we include an identifier. This makes the allocation idempotent, meaning if we run this mutation again with the same identifier, we’ll get the same IP address instead of a new one.
mutation {
  IPAddressPoolGetResource(data: {
    id: "1853afae-82df-939d-ca91-10657fd1c6c9",
    identifier: "device-01"
  })
  {
    ok
    node {
      id
      display_label
    }
  }
}
The final mutation creates a device. We set the name, the site, and the type, then assign a primary address by telling Infrahub to pick the next available IP from the pool. When the mutation completes, it returns the device details along with the IP that was assigned from the pool.
mutation {
  InfraDeviceCreate(data: {
    name: {value: "device-02"},
    site: {id: "1808d320-afbd-9656-d0e7-c515cf3a1de4"},
    type: { value: "MX204" },
    primary_address: {
      from_pool: {
        id: "1853afae-82df-939d-ca91-10657fd1c6c9"
      }
    }
  })
  {
    ok
    object {
      display_label
      primary_address {
        node {
          address {
            value
          }
        }
      }
    }
  }
}
Managing IP prefixes with weighted allocation
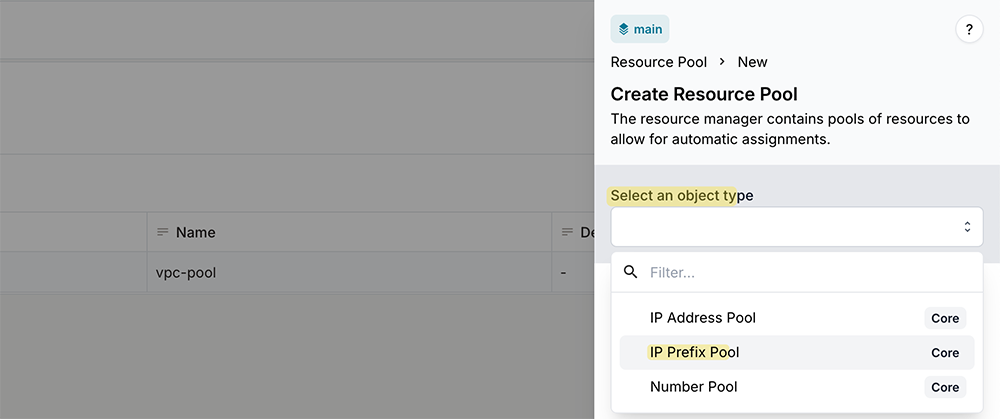
So far, we’ve covered allocating individual IP addresses. The process is the same when allocating IP prefixes. The main difference is that when you create a pool, you select IP Prefix Pool instead of IP Address Pool.
A CoreIPPrefixPool allows you to dynamically allocate IP prefixes from one or multiple source prefixes. You first create a parent prefix (or multiple parent prefixes) and add them to the pool. In the pool configuration, you can specify the prefix length you want to allocate each time.
The allocation logic follows the same pattern we saw before. You can allocate directly from the pool or allocate as part of a relationship on a node. You can also use an identifier when allocating, which makes the allocation idempotent, so running the same request again with the same identifier returns the same prefix.
For this next part, I’ll use my own Infrahub instance instead of the sandbox. This lets me show how weighted allocation works. I’m running Infrahub with the schema from the Schema Library.
What is weighted allocation?
Weighted allocation lets you control which prefix in a pool gets used first. You can have multiple prefixes inside the same resource pool, and each prefix can be given an allocation weight. A higher weight means the prefix will be preferred when someone requests a new one.
For example, you can add several /24 prefixes to a pool and assign different weights like 5, 10, or 15. When the resource manager needs to pick a prefix to allocate from, it will first use the one with the highest weight before moving to the others.
Weighted allocation can be very useful in various scenarios. Suppose you have multiple point‑to‑point links in your network that use a /31, and you’ve already allocated one /24 block for them. Later, as the network grows, you decide to allocate another /24 block. By giving the first /24 a higher weight, you make sure the resource manager uses addresses from the first block until it runs out before starting to use the new block.
Enabling weighted allocation
To enable weighted allocation, you need to update your schema so that your Prefix resource inherits from the CoreWeightedPoolResource generic. This automatically adds the allocation_weight attribute to your Prefix resource. Because I’m using my own Infrahub instance, I can update the schema easily to include this inheritance.
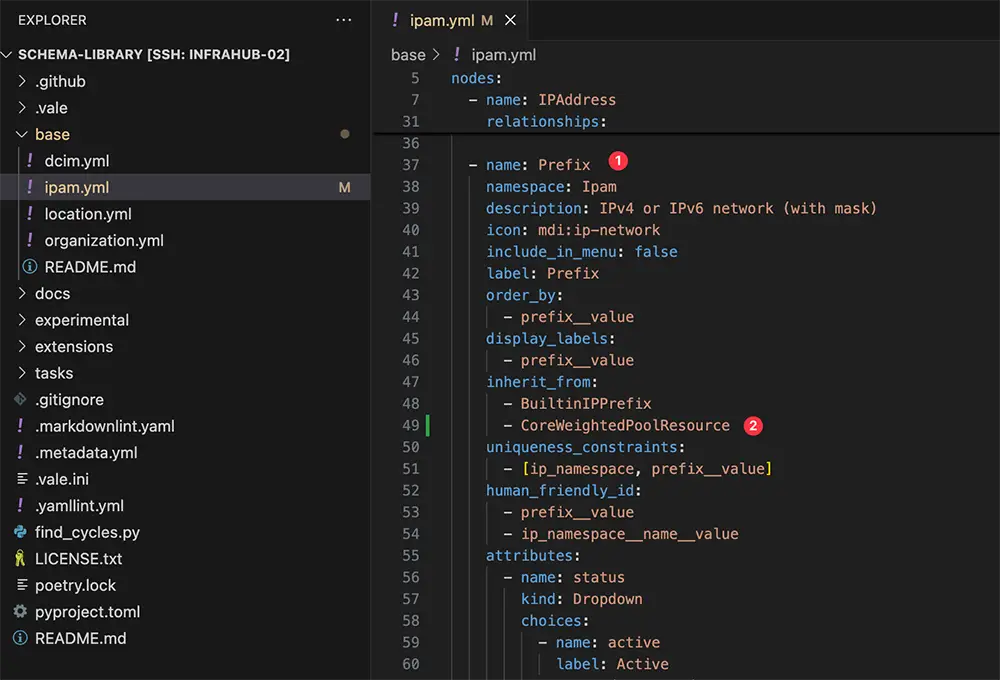
Importing and updating the schema is outside the scope of this post, but at a high level, we use the infrahubctl CLI tool to manage schema changes. I updated the schema as shown above (by adding line #49), then SSH’d to the Infrahub node and loaded the updated schema using the following command:
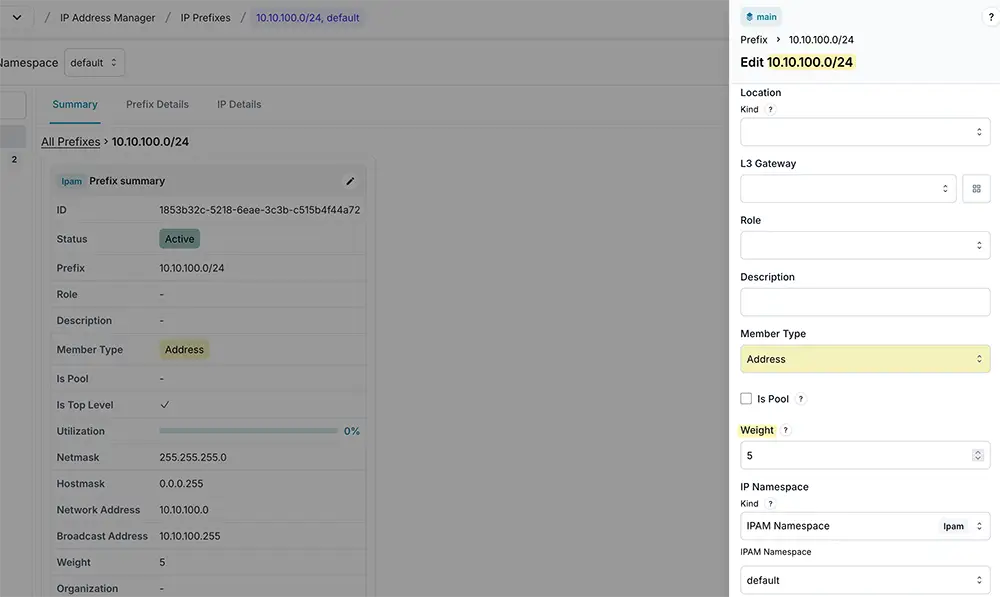
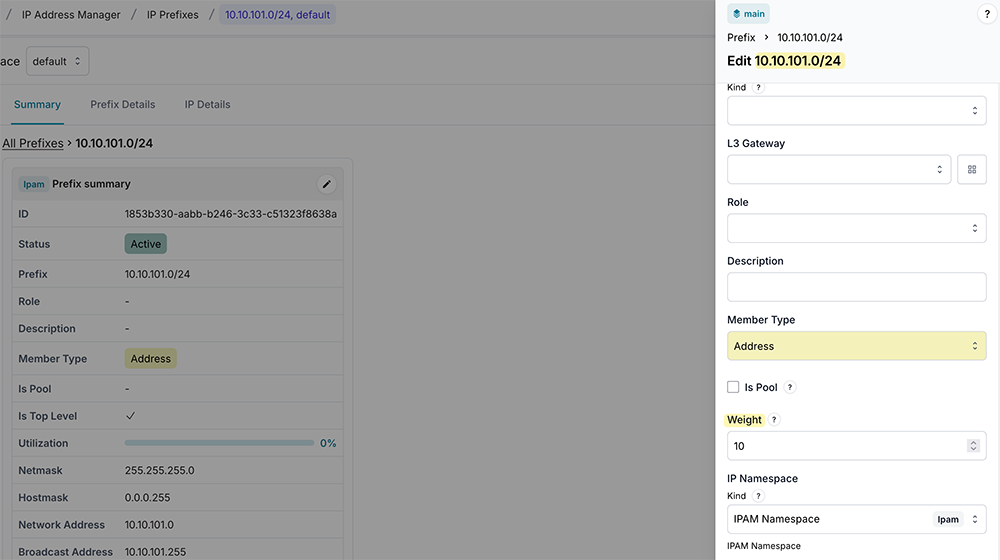
infrahubctl schema load base/Now that the schema is updated, we should be able to add a weight to each prefix. To kick things off, I created two /24 prefixes:
- 10.10.100.0/24 with weight 5
- 10.10.101.0/24 with weight 10
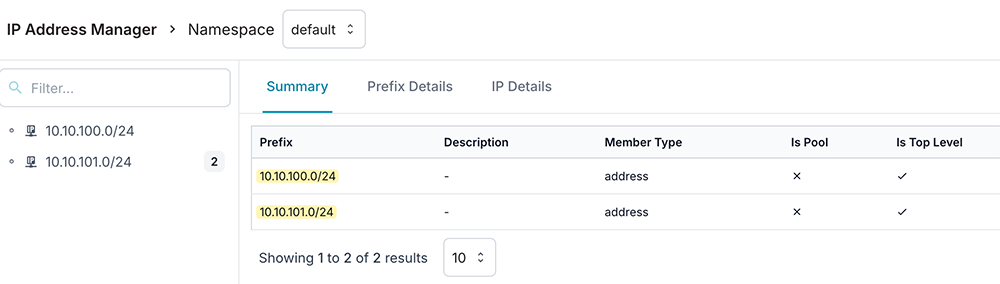
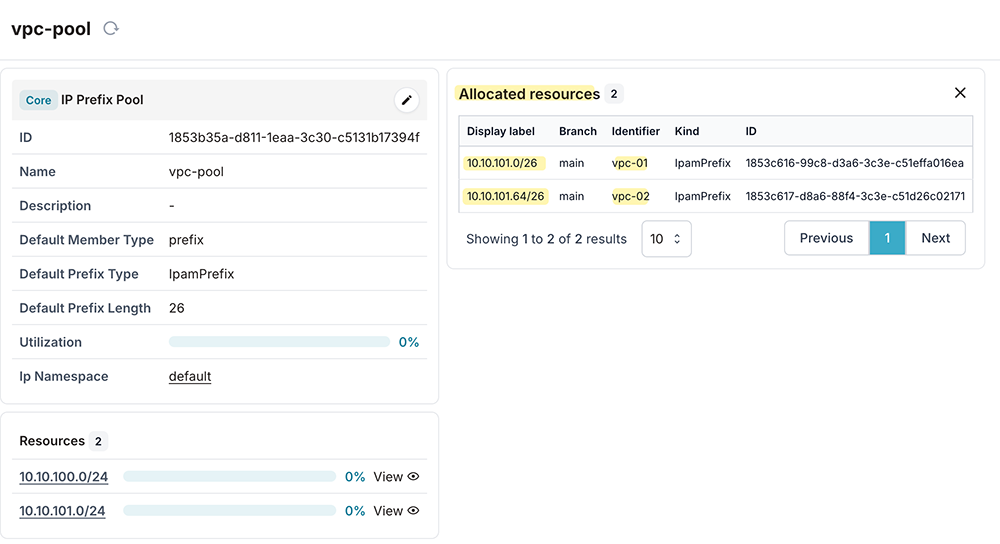
Both prefixes are then added to the pool. When we allocate from this pool, the resource manager will first use 10.10.101.0/24 because it has the higher weight.

I’m going to make two allocations with the identifiers vpc-01 and vpc-02. Here’s the GraphQL mutation for identifier vpc-02.
mutation {
    IPPrefixPoolGetResource(data: {
      id: "1853b35a-d811-1eaa-3c30-c5131b17394f",
      identifier: "vpc-02",
      data:{
        status: {
          value: "active"
        }
      }
    })
    {
      ok
      node {
        id
      }
    }
  }
If we head over to the allocation, the most obvious thing to notice is that the allocated IP prefixes come from the prefix 10.10.101.0/24, which is exactly what we expected because this prefix has the higher weight.
Using number pools to manage VLAN IDs and BGP ASNs
A CoreNumberPool is connected to a numeric attribute on a node. It lets you automatically assign numbers from a defined range to that attribute. For example, you can use a number pool to allocate VLAN IDs or BGP ASNs without manually tracking what’s free.
The process is the same as the other pools we have looked at. You create a pool, then start allocating from it.
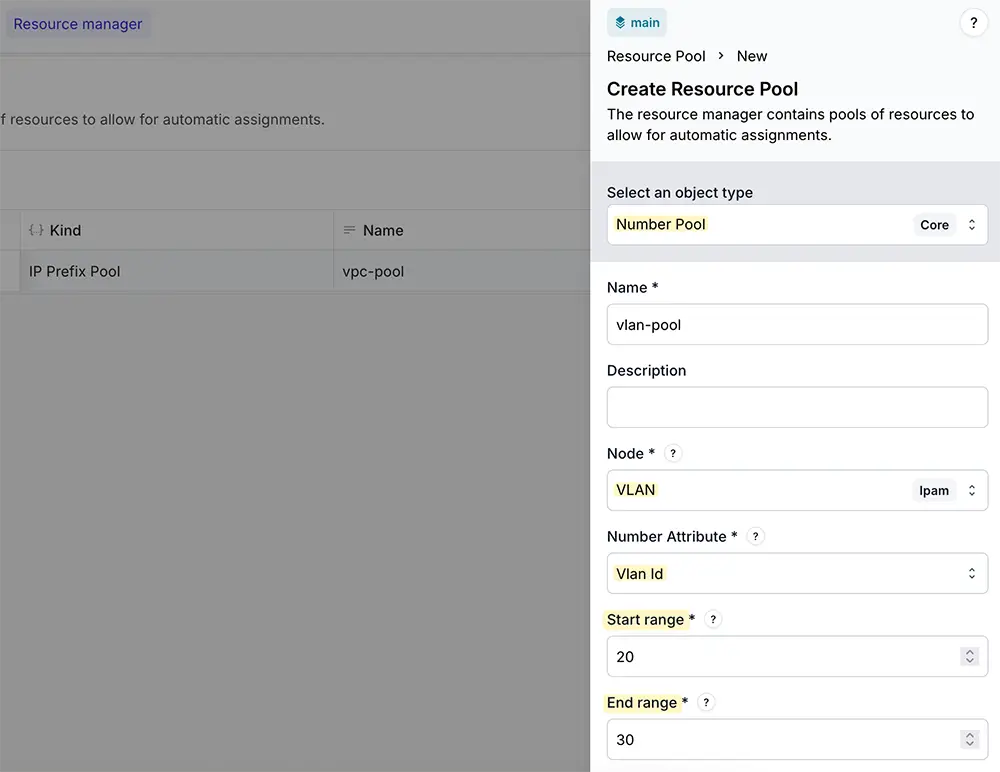
When creating the pool, set the object type to Number Pool, choose the node (for example, VLAN), pick the numeric attribute VLAN ID, and define the start and end range for the numbers you want to allocate.
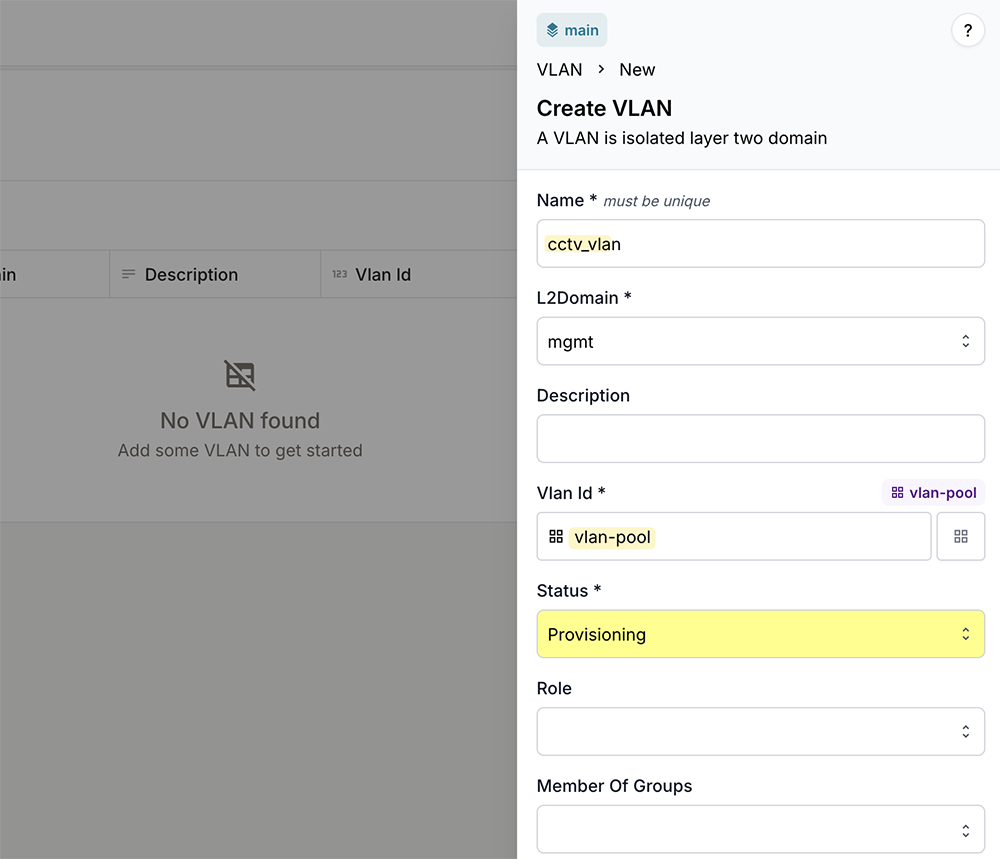
Now if we create a VLAN, instead of manually picking a VLAN ID, I can simply select the pool. The resource manager will automatically assign the next available VLAN ID from that pool.
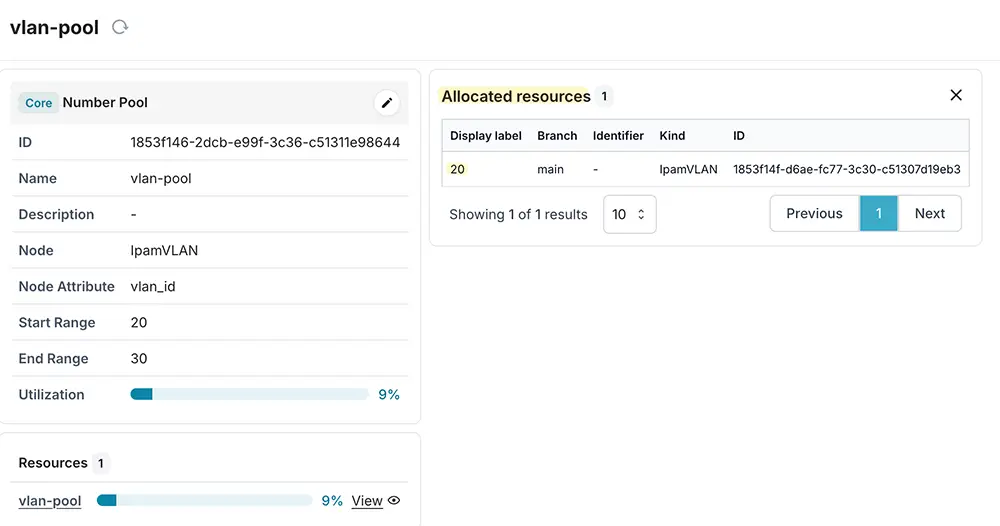
As usual, if you head over to the pool and check the allocation, you can see the newly allocated VLAN ID.
The process is exactly the same for BGP ASN, so I’ll skip repeating the steps. Just like with VLAN IDs, you create a number pool, set the range for your ASNs, and start allocating.
Final considerations for working with Infrahub Resource Manager
When planning pools, it’s important to think about pool sizing. Make sure the parent prefixes or VLAN ranges you allocate are large enough to cover expected growth. It’s also a good idea to monitor your pool allocations regularly so you can see how much of the pool is being used over time.
Handling allocation failures is important too, so build logic into your automation to detect when a pool runs out of resources. You can set this to trigger an action, such as adding more prefixes or notifying someone through a Slack channel.
More than an IPAM tool, Infrahub Resource Manager can automatically manage allocations for all of your shared resources, from IP addresses and prefixes to VLANs and ASNs. With Resource Manager in place, your team can confidently pull resource assignments whenever they need them, while never having to worry about conflicts.
